
Repairing a defective faucet handle

Bastli and one other contributor
Last updated on Dec 25, 2025
Views: 3.4K
View statistics:
- Past 24 Hours:
- 7
- Past 7 Days:
- 46
- Past 30 Days:
- 216
- All Time:
- 3,373
Comments: 0
No one has left comments on this guide. Will you be first?
Go to guide commentsCompleted: 0 1
No one has marked this guide "completed." Will you be the first?
1 person has marked this guide "completed." It's you — great job!
Favorites: 0 1
No one has favorited (and subscribed to) this guide. Will you be the first?
1 person has favorited (and subscribed to) this guide — and that's you!
Featured Guide
This guide has been found to be exceptionally cool by the iFixit staff.
Community-Contributed Guide
An awesome member of our community made this guide. It was not created by iFixit staff.
Introduction
Go to step 1 ↓The side wall of the single-lever mixing handle for controlling water stream volume, has broken. If you don't have a welder, you will have to replace the lever—or you can follow these instructions.
What you need
Parts
-
Ballymore Screw M4X30-H GB/T 818-2000 (Local Pickup) (Schraube M4 > 25mm)
Typ des Schraubenkopfes spielt keine Rolle, der Schraubenkopf wird abgetrennt. Nur die Gewindestange wird benötigt
Tools
-
Bohrer 3 mm (3mm - 3,5 mm)
Metallbohrer. Der Hersteller des Gewindeschneiders empfiehlt idR den optimalen Durchmesser
-
Flat File (Metallfeile)
Dient dem Kürzen des M4-Schraubengewindes
-
Digital Caliper$39.954.8
Schieblehre, Mess-Schieber, Kaliper, Schublehre sind Synonyme für dieses Werkzeug
-

-
-
-
The mixing lever can simply be removed, if necessary wooden sticks or plastic cards can help. In this instance, the mixing lever came off in my hand with only a slight pull.
-
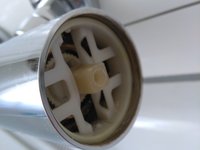
The picture shows the inner workings of the faucet after removing the mixing lever and protective dome. The protective dome can be easily pulled off.
-
The yellowish lever has a hole with a diameter of about 4 mm. An M4 screw will screw into it. With this repair, however, we would like to be able to push it in without having to make a screwing motion.
-
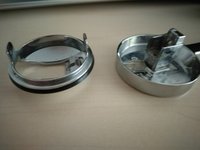
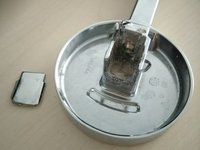
A picture of the mentioned dome and the dismantled lever.
-
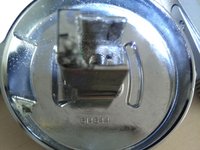
A number is stamped inside the lever. Whether this is a type or serial number is unknown to this author Number: 614644
 Ask FixBot
-
-
-
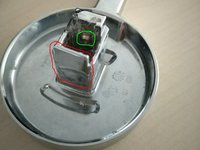
Inner workings of the lever: The piece outlined in red has broken out.
-
Marked in green is the adjusting screw, which, if over-tightened, could possibly cause the red wall to break.
-
This adjustment screw will not be needed henceforth.
-
And another picture of the lever with the broken wall.
-
-
-
An important note about this step: The author didn't realize how lucky he was in drilling so that the lever fit almost perfectly onto the faucet again.
-
Hence the recommendation: stick to the specified measurements as closely as possible!
-
The metal block in the mixing lever is 1 cm thick, a drilling depth of 8mm is quite possible. But: 6mm depth is enough.
-
Before drilling, mark the center of the hole with a steel nail, i.e. make a first notch so that the metal drill bit does not slip. The hole must be drilled in the middle, and the distance from the center of the hole to the outer surface of the broken out wall (marked in red) should be 6.4 mm.
-
-
-
-
The drilling and tapping are not pictured. The photo shows the result with the M4 thread inserted.
-
Depth of the hole: 6-8mm. Diameter of the metal drill: between 3 and 3.5 mm. Follow the recommendations of the threading tool used. The drilling diameter should not be more than 3.8 mm, because the thread cutter still needs material into which it can cut. The author used a 3.5mm metal drill.
-
After drilling: use the thread cutter (tapping tool) to cut the thread into the hole. Screw the M4 threaded rod into the hole until it is tight
-
The protruding head of the inserted screw is a little too wide: it cannot be pushed into the plastic hole in the fitting.
-
The thread of the screw can be crushed a little with flat-nose pliers or filed off a bit with a metal file. Don"t file too much! Some resistance when inserting the lever is desired.
-
The pictures show the result with the M4 screw inserted. Ideally, the screw should protrude 19mm from the base. The screw can be shortened with a metal file.
-
Insert the lever back onto the mixer tap together with the dome. Done. The author hopes that this lever will last at least 8 years (again).
-
-






Work through the steps in reverse order to reassemble your device.
Special thanks to these translators:
100%

Juan Garcia is helping us fix the world! Want to contribute?
Start translating ›

