
Repairing a Dried-Out Sharpie Marker

Hannah Green and one other contributor
Last updated on May 24, 2023
Views: 3.1K
View statistics:
- Past 24 Hours:
- 9
- Past 7 Days:
- 50
- Past 30 Days:
- 172
- All Time:
- 3,062
Comments: 2
1 comment on steps, 1 guide comment.
Go to guide commentsCompleted: 3 4
3 people have marked this guide "completed." Will you be next?
4 people have marked this guide "completed." Including you — great job!
Favorites: 0 1
No one has favorited (and subscribed to) this guide. Will you be the first?
1 person has favorited (and subscribed to) this guide — and that's you!
Introduction
Go to step 1 ↓A Sharpie can quickly dry out if you leave the cap off too long or use it often, making it weaker or completely unusable. Many Sharpies are thrown away because of this.
If your Sharpie has become dried-out and hard to use, you can use this guide to revive its ink and keep it out of the trash.
For this guide, it is recommended that you wear gloves so that you do not get ink or rubbing alcohol on yourself.
What you need
Tools
-
×2
-
High Content Rubbing Alcohol$12.99
-


-
-
-
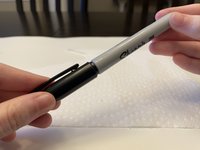
Use a pair of pliers to separate the black part from the grey part of the Sharpie.
-
-
-
Drip the rubbing alcohol into the part of the ink pad that has a sponge with a hole in its center. Do this until the sponge seems saturated (or about 5 drops).
-
-



 Ask FixBot


Cancel: I did not complete this guide.
3 other people completed this guide.

Team

University of Memphis, Team 51-5, Peters Spring 2023 Member of University of Memphis, Team 51-5, Peters Spring 2023
UM-PETERS-S23S51G5
1 Member
12 Guides authored
1 Guide Comment
Si le marqueur a été laissé longtemps sans bouchon, l'alcool marche très bien.
Par contre si il est simplement vidé (beaucoup servi ou servi sur un support poreux, un tissu…) on peut faire la même chose avec de l'encre à marqueur à alcool à la place de l'alcool. Une petit flacon permet de recharger des dizaines de marqueurs.
On peut également recharger la plupart des feutres à eau de la même manière (avec de l'eau du robinet). Certains feutres qui paraissent scellés peuvent en réalité s'ouvrir avec une bonne pince, soit du côté de la tête, soit de l'autre côté (ils sont juste très ajustés par sécurité). Solution très économique et durable pour les feutres des enfants.
