
Razer Naga Trinity Disassembly

Alexandros Andreou and 4 other contributors
Last updated on Dec 22, 2021
Views: 43K
View statistics:
- Past 24 Hours:
- 18
- Past 7 Days:
- 79
- Past 30 Days:
- 363
- All Time:
- 42,920
Comments: 13
1 comment on steps, 12 guide comments.
Go to guide commentsCompleted: 19 20
19 people have marked this guide "completed." Will you be next?
20 people have marked this guide "completed." Including you — great job!
Favorites: 0 1
No one has favorited (and subscribed to) this guide. Will you be the first?
1 person has favorited (and subscribed to) this guide — and that's you!
Introduction
Go to step 1 ↓This prerequisite guide is to help users disassemble the mouse. The mouse needs to be mostly disassembled in order to complete most of the tasks needed to fix any issues.
Put on the anti-static wrist strap to protect you from electrostatic discharges during your repair.
What you need
Tools
-
Spudger4.9
-


-
-
-
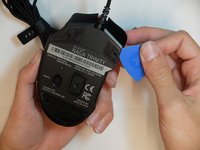
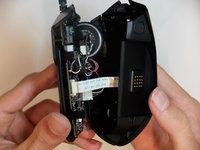
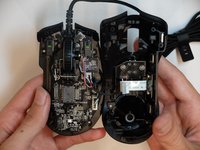
Separate the top mouse housing from the bottom mouse housing using the opening pick.
-
-
-
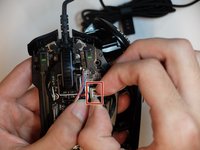
Unlock the ribbon connector that is held down by the main board clips using the spudger's pointed end.
-
-


 Ask FixBot




To reassemble your device, follow these instructions in reverse order.
Cancel: I did not complete this guide.
19 other people completed this guide.

Team

Embry-Riddle Aeronautical University, Team S6-G2, Salas Fall 2019 Member of Embry-Riddle Aeronautical University, Team S6-G2, Salas Fall 2019
ERAU-SALAS-F19S6G2
4 Members
60 Guides authored
12 Guide Comments
I would like to to point out that at step 7, second picture, the 3-pin connector is for the top 2 buttons. the RGB LED is actually in the board and can be seen in step 7 first picture, tiny white square at the bottom, top left where it says K7-D1.
The cable for the Naga2014 fits admirably and appears to work fully, BUT NOTE: the green and white wires need to be swapped around in the plug at the end that connects inside the mouse.
If you feel along the back, you'll notice that it is 'rougher' than the injection-molded plastic; this is a sticker that hides 4 Phillips #1 screws and two more magnets. Peel off the sticker and remove the screws--the plate should then lift right out. I... discovered this the hard way after destructively disassembling a broken 12-button part because the design LOOKS like it just clips on, and I wasn't sure if this was a heat glue situation or something else. Here's the 6-button part fully disassembled. https://i.imgur.com/xK7IPus.jpg
How do you remove the board so that you can replace the mouse buttons when they break?

