
Free Shipping on Domestic Orders $75+

Razer Barracuda X Motherboard Replacement

What you need

  1. Razer Barracuda X Motherboard Replacement, Motherboard: step 1, image 1 of 2 Razer Barracuda X Motherboard Replacement, Motherboard: step 1, image 2 of 2
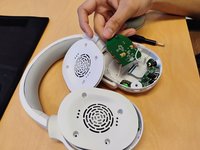
    • Remove the cushion by pulling it off from the edge and out from the grooves, Continue to pull the cushion away from the speaker until the cushion is fully separated.

  2. Razer Barracuda X Motherboard Replacement: step 2, image 1 of 3 Razer Barracuda X Motherboard Replacement: step 2, image 2 of 3 Razer Barracuda X Motherboard Replacement: step 2, image 3 of 3
    • Using a Phillips #0 screwdriver to unscrew the four screws that attach the two pieces of the right speaker together.

    • Gently lift the plastic plate away from the housing, with care not to damage the connected wire.

  3. Razer Barracuda X Motherboard Replacement: step 3, image 1 of 1
    • Using a Phillips #0 screwdriver, remove the single screw attaching the volume spinner to the motherboard.

    • Remove the spinner.

  4. Razer Barracuda X Motherboard Replacement: step 4, image 1 of 1
    • Remove the Phillips #0 screws securing the I/O board from the bottom shell of the right speaker.

  5. Razer Barracuda X Motherboard Replacement: step 5, image 1 of 2 Razer Barracuda X Motherboard Replacement: step 5, image 2 of 2
    Tool used on this step:
    Tweezers
    $4.99
    Buy
    • To fully remove the I/O board from the right speaker, use tweezers to unplug the ribbon cable attaching the I/O board to the main motherboard.

  6. Razer Barracuda X Motherboard Replacement: step 6, image 1 of 1
    • Using the same Philips #0 screwdriver, remove the four screws attaching the motherboard to the plastic housing. Once those screws are removed, remove the main motherboard and replace it.

  7. Razer Barracuda X Motherboard Replacement: step 7, image 1 of 3 Razer Barracuda X Motherboard Replacement: step 7, image 2 of 3 Razer Barracuda X Motherboard Replacement: step 7, image 3 of 3
    • Desolder all of the remaining motherboard connections.

    • Do not hold the iron by the barrel as depicted in the images.

    • Remove the motherboard.

Conclusion

To reassemble your device, follow the above steps in reverse order.
Take your e-waste to an R2 or e-Stewards certified recycler.
Repair didn’t go as planned? Try some basic troubleshooting or ask our Answers community for help.

5 other people completed this guide.

Josiah Cassidy

Member since: 10/26/22

250 Reputation

2 Guides authored

Team

UMass Dartmouth, Team 2-3, Petersen Fall 2022 Member of UMass Dartmouth, Team 2-3, Petersen Fall 2022

UMASSD-PETERSEN-F22S2G3

4 Members

10 Guides authored

5 Guide Comments

Now if I could just find somewhere to buy the I/O board. My volume slider is crackling and sometimes one cup is louder than the other.

Michael Nugent - Reply Share

You ever find a replacement?

Gaelan Garrett - Reply Share

i found that submerging the volume dial in Isopropyl alcohol and moving the volume up and down cleans the wheel internal contacts and it no longer has this issue.

Mexicanskynet - Reply Share

@mexicanskynet what did you submerge exactly? the spinner or the mechanizm under it?

suny set - Reply Share

@michaelnugent My volume wheel just broke too! Must be a weak point in the design.

Michael Shu - Reply Share

Add Comment

View Statistics:

Past 24 Hours: 2

Past 7 Days: 36

Past 30 Days: 130

All Time: 6,110