
ProScan PLT7223G Motherboard Replacement

Daniel Hernandez and 3 other contributors
Last updated on Apr 14, 2016
Views: 2K
View statistics:
- Past 24 Hours:
- 3
- Past 7 Days:
- 15
- Past 30 Days:
- 93
- All Time:
- 2,041
Comments: 1
1 guide comment.
Go to guide commentsCompleted: 2 3
2 people have marked this guide "completed." Will you be next?
3 people have marked this guide "completed." Including you — great job!
Favorites: 1 2
1 person has favorited (and subscribed to) this guide. Will you be next?
2 people have favorited (and subscribed to) this guide — including you!
Introduction
Go to step 1 ↓If your device isn't working and other troubleshooting methods have failed, or a component of the motherboard has failed, use this guide to replace the motherboard and make your device functional again.
What you need
Tools


-
-
-
Remove both 4 mm screws from the top of the tablet using a PH00 screw driver.
 Ask FixBot
-
-
-
With the soldering tool remove the speaker wires, battery wires and gray wire that are connected to the motherboard.
-
-
-
-
Use a PH00 screw driver to remove the three 4 mm screws holding the motherboard down.
-
-


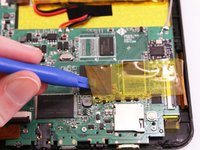


To reassemble your device, follow these instructions in reverse order.
Cancel: I did not complete this guide.
2 other people completed this guide.

Team

Eastern Washington University, Team 1-4, Rowley Winter 2016 Member of Eastern Washington University, Team 1-4, Rowley Winter 2016
EWU-ROWLEY-W16S1G4
4 Members
60 Guides authored
1 Guide Comment
Once the motherboard is out, what do you do ? Where do I go? More information would be appreciated.
