Free Shipping on Domestic Orders $75+

PowerBook G3 Pismo RAM Replacement

Views: 18K

View statistics:

Past 24 Hours:
5
Past 7 Days:
24
Past 30 Days:
122
All Time:
18,034
Comments: 4

3 comments on steps, 1 guide comment.

Go to guide comments
Completed: 16

16 people have marked this guide "completed." Will you be next?

Favorites: 1

1 person has favorited (and subscribed to) this guide. Will you be next?

Time Required: No estimate
Difficulty: Easy
Featured Guide

This guide has been found to be exceptionally cool by the iFixit staff.

PowerBook G3 Pismo RAM Replacement

Introduction

Go to step 1 ↓

Two RAM slots allow up to 1 GB of PC100 or PC133 RAM.

What you need

Parts

Tools

    1. PowerBook G3 Pismo RAM Replacement, Keyboard: step 1, image 1 of 1
      • Turn the keyboard locking screw so that it is parallel to the space bar.

      • Pull the keyboard release tabs toward you and lift up on the keyboard until it pops free.

      • Lift the keyboard out by pulling it up and away from you. Rest the keyboard, face down, on top of the track pad.

      Ask FixBot

      Add Comment

    2. PowerBook G3 Pismo RAM Replacement: step 2, image 1 of 1
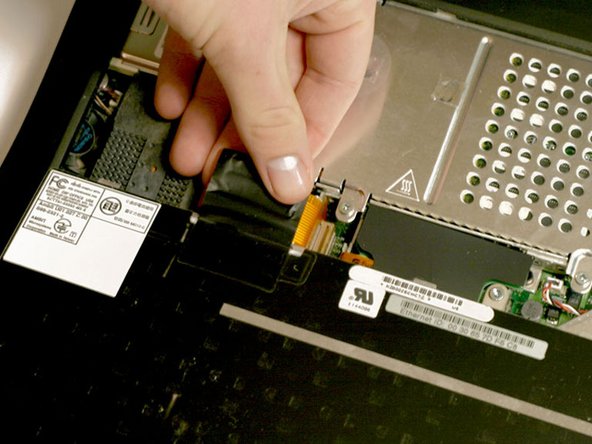
      • Pull the keyboard ribbon straight up from the logic board. Place the keyboard aside.

      • The connector may be tight. Gently rock the connector from side to side while pulling directly upward to free it. You can use this technique on many of the cards and cables you'll be disconnecting.

      • Make sure you have removed the laptop battery and CD/DVD modules from the expansion bays before proceeding.

      Ask FixBot

      Add Comment

    3. PowerBook G3 Pismo RAM Replacement: step 3, image 1 of 1
      • Your laptop should look approximately like this.

      Ask FixBot

      Add Comment

    1. PowerBook G3 Pismo RAM Replacement, Heat Shield: step 4, image 1 of 1
      • Remove the two silver Phillips #1 screws that attach the heat shield to the internal metal framework.

      • Lift the heat shield up and pull it toward you.

      Ask FixBot

      Add Comment

    2. PowerBook G3 Pismo RAM Replacement: step 5, image 1 of 1
      • Your laptop should look approximately like this.

      Ask FixBot

      Add Comment

    1. PowerBook G3 Pismo RAM Replacement, Airport Card: step 6, image 1 of 1
      • Skip this step if your computer does not have an Airport card installed.

      • Firmly grasp the plastic tab attached to the Airport card and pull up and then to the right.

      • The Airport card is still attached to the antenna cable, so don't just yank it out of the slot.

      Ask FixBot

      Add Comment

    2. PowerBook G3 Pismo RAM Replacement: step 7, image 1 of 1
      • Disconnect the antenna cable from the Airport card.

      Ask FixBot

      Add Comment

    1. PowerBook G3 Pismo RAM Replacement, PRAM Battery: step 8, image 1 of 1
      • Pull the battery cable directly up from the logic board.

      • Remove the battery from its holder by pulling up and to the left.

      Ask FixBot

      Add Comment

    2. PowerBook G3 Pismo RAM Replacement: step 9, image 1 of 1
      • Your laptop should look approximately like this.

      Ask FixBot

      Add Comment

    1. PowerBook G3 Pismo RAM Replacement, Heat Sink: step 10, image 1 of 1
      • Remove the long silver Phillips #1 screw from the heat sink.

      • Remove the two T8 Torx screws that attach the heat sink to the processor.

      Ask FixBot

      Add Comment

    2. PowerBook G3 Pismo RAM Replacement: step 11, image 1 of 1
      • Lift the heat sink up from the left side and pull it out.

      • If you need to mount the heat sink back into the laptop, we have a thermal paste guide that makes replacing the thermal compound easy.

      Ask FixBot

      Add Comment

    1. PowerBook G3 Pismo RAM Replacement, Processor: step 12, image 1 of 1
      • Grasp the plastic tab on the processor's right side and pull it directly up.

      • Some processors may be missing the plastic pull tab. In this case, we suggest using a non-metal tool to gently pry up the processor. Slip the tool's thin edge under the front right corner of the processor and carefully pry it up.

      Ask FixBot

      Add Comment

    2. PowerBook G3 Pismo RAM Replacement: step 13, image 1 of 1
      • Your laptop should look approximately like this.

      Ask FixBot

      Add Comment

    1. PowerBook G3 Pismo RAM Replacement, RAM: step 14, image 1 of 1
      • Release the tabs on each side of the RAM chip at the same time. These tabs lock the chip in place and releasing them will cause the chip to "pop" up.

      • Pull the RAM chip out.

      • There are RAM slots on both sides of the processor. We recommend installing higher capacity chips on the bottom so that if you want to upgrade later, you won't have to remove the processor.

      Ask FixBot

      Add Comment

Conclusion

To reassemble your device, follow these instructions in reverse order.

Cancel: I did not complete this guide.

16 other people completed this guide.

Attached Documents

iRobot

Member since: 09/24/09

1 Reputation

632 Guides authored

1 Guide Comment

Way too many steps in my opinion. First, the battery should be removed. I saw no reason to remove keyboard, folding it over was enough. Also, saw no reason to remove PRAM battery, I did disconnect it, however. The AirPort card didn’t have to be removed, either. Once the shield was removed along with the heatsink, the processor board just popped right out. When replacing board, make sure the little tabs are in their slots since the board won’t push back in all of the way. Thanks iRobot!

pjmrozinski - Reply Share

Add Comment

View Statistics:

Past 24 Hours: 5

Past 7 Days: 24

Past 30 Days: 122

All Time: 18,034