
PowerA Enhanced Wireless Controller Motherboard Replacement

Alberto Del Calvo Lopez and 5 other contributors
Last updated on Jan 5, 2024
Views: 5K
View statistics:
- Past 24 Hours:
- 2
- Past 7 Days:
- 33
- Past 30 Days:
- 100
- All Time:
- 4,975
Comments: 1
1 guide comment.
Go to guide commentsCompleted: 2 3
2 people have marked this guide "completed." Will you be next?
3 people have marked this guide "completed." Including you — great job!
Favorites: 1 2
1 person has favorited (and subscribed to) this guide. Will you be next?
2 people have favorited (and subscribed to) this guide — including you!
Introduction
Go to step 1 ↓This guide will show you how to access and replace the motherboard of your PowerA Enhanced Wireless Controller for Nintendo Switch. Replacing the motherboard is a necessary step for fixing stick drift and power-related issues on your controller. Other motherboard issues are often characterized by unresponsive buttons and your controller failing to immediately turn on.
Before beginning the repair process, it's important to remove the batteries from your controller to ensure your safety during the repair and prevent any additional issues. Step 1 of this guide will show you how to access the battery compartment to remove the batteries.
What you need
Tools


-
-
-
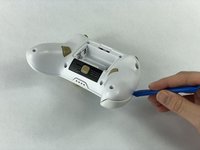
Remove the battery cover by pressing down on the lever located on the top of the cover.
-
Apply pressure until it clicks out of place, and pull it off.
 Ask FixBot
-
-
-
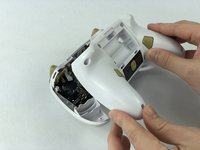
Insert the iFixit opening tool into the seam and gently pry the cover plate up.
-
Remove the cover plate once it is loosened.
-
-
-
-
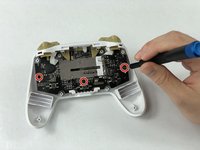
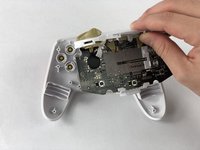
Remove all three screws securing the motherboard using the J00 screwdriver.
-
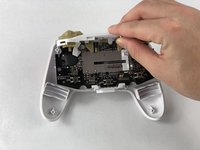
Remove the motherboard.
-
-




To reassemble your device, follow these instructions in reverse order.
Cancel: I did not complete this guide.
2 other people completed this guide.

Team

USF Tampa, Team S1-G5, Leahy Fall 2019 Member of USF Tampa, Team S1-G5, Leahy Fall 2019
USFT-LEAHY-F19S1G5
3 Members
60 Guides authored
1 Guide Comment
Je cherche un couvercle de batterie pour ma manette switch
Auriez-vous un site où il est possible de s’en procurer un ?
Merci
