Free Shipping on Domestic Orders $75+

Panasonic Lumix DMC-ZS3 Back Cover Replacement

What you need

  1. Panasonic Lumix DMC-ZS3 Back Cover Replacement, Back Cover: step 1, image 1 of 3 Panasonic Lumix DMC-ZS3 Back Cover Replacement, Back Cover: step 1, image 2 of 3 Panasonic Lumix DMC-ZS3 Back Cover Replacement, Back Cover: step 1, image 3 of 3
    • Remove the eleven 3 mm screws securing the covers to the ZS3.

    • Using too much pressure when removing the screws may strip the screws and complicate screw removal at a later time.

    Ask FixBot
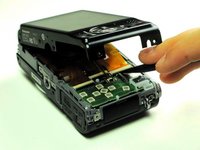
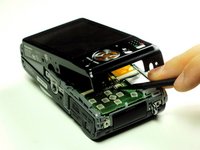
  2. Panasonic Lumix DMC-ZS3 Back Cover Replacement: step 2, image 1 of 2 Panasonic Lumix DMC-ZS3 Back Cover Replacement: step 2, image 2 of 2
    • Use the flat end of a spudger to pry apart the back cover from the rest of the unit as shown.

    • Be sure to carefully and slowly lift the back cover. Forcefully lifting the back cover and fully separating it at this point may ruin internal connections.

    Ask FixBot
  3. Panasonic Lumix DMC-ZS3 Back Cover Replacement: step 3, image 1 of 2 Panasonic Lumix DMC-ZS3 Back Cover Replacement: step 3, image 2 of 2
    • Using your fingernail or a spudger, flip up the ZIF locking flap on the two LCD ribbon cable sockets that connect the back cover to the rest of the unit.

    • Be sure you are opening the locking tab, not pulling against the socket mounted to the board.

    Ask FixBot
  4. Panasonic Lumix DMC-ZS3 Back Cover Replacement: step 4, image 1 of 1
    • Remove the two LCD board ribbon cables out of their sockets.

    Ask FixBot
Conclusion

To reassemble your device, follow these instructions in reverse order.

Team

Cal Poly, Team 13-60, Johann Spring 2013 Member of Cal Poly, Team 13-60, Johann Spring 2013

CPSU-JOHANN-S13S13G60

3 Members

10 Guides authored

0 Guide Comments

Add Comment

View Statistics:

Past 24 Hours: 3

Past 7 Days: 13

Past 30 Days: 72

All Time: 1,171