Free Shipping on Domestic Orders $75+

Palm IIIx Motherboard Assembly Replacement

What you need

  1. Palm IIIx Motherboard Assembly Replacement, Battery: step 1, image 1 of 1
    • Place the Palm IIIx face down on a flat surface.

    Ask FixBot

    Add Comment

  2. Palm IIIx Motherboard Assembly Replacement: step 2, image 1 of 1
    • Push down and lift up the battery cover to remove it.

    Ask FixBot

    Add Comment

  3. Palm IIIx Motherboard Assembly Replacement: step 3, image 1 of 1
    • Remove the old batteries one at a time.

    Ask FixBot

    Add Comment

  4. Palm IIIx Motherboard Assembly Replacement, Motherboard Assembly: step 4, image 1 of 1
    • Using a Phillips #00 screwdriver, remove the four screws that hold the back cover in place.

    Ask FixBot

    Add Comment

  5. Palm IIIx Motherboard Assembly Replacement: step 5, image 1 of 1
    • Hold the device on its side, positioning your hands as shown.

    • Remove the back cover by pushing in with your thumbs and pulling outward with the rest of your fingers.

    Ask FixBot

    Add Comment

  6. Palm IIIx Motherboard Assembly Replacement: step 6, image 1 of 1
    • Hold the screen and front cover on its side, facing the screen inward as shown.

    • Remove the screen by pushing outward with your thumbs. Use your index fingers to hold the front cover in place.

    Ask FixBot

    Add Comment

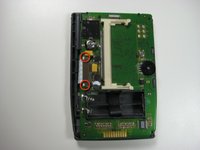
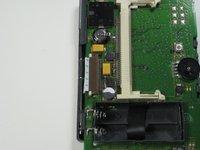
  7. Palm IIIx Motherboard Assembly Replacement: step 7, image 1 of 2 Palm IIIx Motherboard Assembly Replacement: step 7, image 2 of 2
    • Position the device with the screen facing down.

    • Locate the white ribbon wire on the left hand side of the device.

    • On either side of the ribbon wire are two white clasps. Gently push the two clasps away from the board (to the left).

    Ask FixBot

    Add Comment

  8. Palm IIIx Motherboard Assembly Replacement: step 8, image 1 of 1
    • Detach the ribbon wire by gently pulling it out of its connector.

    Ask FixBot

    Add Comment

  9. Palm IIIx Motherboard Assembly Replacement: step 9, image 1 of 1
    • Separate the motherboard from the screen.

    Ask FixBot

    Add Comment

  10. Palm IIIx Motherboard Assembly Replacement: step 10, image 1 of 1
    • Now the motherboard assembly can be replaced successfully.

    Ask FixBot

    Add Comment

Conclusion

To reassemble your device, follow these instructions in reverse order.

Cancel: I did not complete this guide.

One other person completed this guide.

Ben Johnson

Member since: 01/26/10

22 Reputation

1 Guide authored

Team

Cal Poly, Team 14-43, Regan Winter 2010 Member of Cal Poly, Team 14-43, Regan Winter 2010

CPSU-REGAN-W10S14G43

4 Members

4 Guides authored

0 Guide Comments

Add Comment

View Statistics:

Past 24 Hours: 0

Past 7 Days: 4

Past 30 Days: 28

All Time: 3,513