
PSP 300x D-Pad Replacement

mbnewsom and 6 other contributors
Last updated on Oct 20, 2015
Views: 14K
View statistics:
- Past 24 Hours:
- 9
- Past 7 Days:
- 49
- Past 30 Days:
- 254
- All Time:
- 14,052
Comments: 8
7 comments on steps, 1 guide comment.
Go to guide commentsCompleted: 5 6
5 people have marked this guide "completed." Will you be next?
6 people have marked this guide "completed." Including you — great job!
Favorites: 3 4
3 people have favorited (and subscribed to) this guide. Will you be next?
4 people have favorited (and subscribed to) this guide — including you!
Inconsistent Images
Updating the images on this guide to be more consistent with the prerequisites would increase its awesomeness.
Introduction
Go to step 1 ↓Steps for replacing malfunctioned directional pads in a Sony PSP-3000
What you need


-
-
-
Place the PSP face down and locate the battery cover on the left side of the device.
-
Lift and remove the battery cover to reveal the battery.
-
Remove the battery.
 Ask FixBot
-
-
-
-
-
Peel back the warranty sticker that is behind the battery with a spudger or your fingernail.
-
-
-
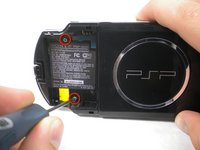
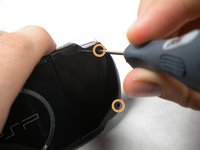
Unscrew all four screws from the back of the PSP with the Phillips #00 Screwdriver.
-
Two are located behind the battery's warranty sticker.
-
Two are located on the right side of the PSP.
-
-
-
Then, remove the single screw from the bottom edge of the PSP (which is positioned next to the barcode).
-
-
-
-
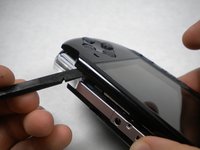
Slide the spudger in between the outer casing of the PSP, beginning at the "R" shoulder button, and gently pry off the casing.
-
Remove the front casing completely.
-
-
-
-
-
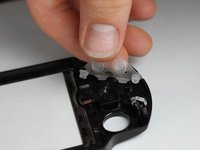
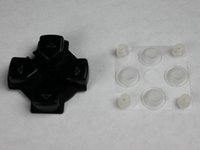
Peal up the rubber pad that is securing the D-pad buttons to the backside of the front casing.
-
Remove the D-pad and the rubber piece.
-
-






To reassemble your device, follow these instructions in reverse order.
Cancel: I did not complete this guide.
5 other people completed this guide.

