Free Shipping on Domestic Orders $75+

PS3 Dual Shock 3 Controler Charging Port Replacement

What you need

    1. PS3 Dual Shock 3 Controler Charging Port Replacement, Opening the Controller: step 1, image 1 of 1
      • Remove the 5 screws on the back of the controller.

      • The back housing of the controller can now be removed.

      Ask FixBot

      Add Comment

    2. PS3 Dual Shock 3 Controler Charging Port Replacement, Removing the Battery: step 2, image 1 of 1
      • Remove battery by unlatching the battery cables from battery connector clip.

      Ask FixBot

      Add Comment

    3. PS3 Dual Shock 3 Controler Charging Port Replacement, Freeing the Motherboard: step 3, image 1 of 1
      • Remove the two screws holding the motherboard to the front controller housing.

      • Next, remove the motherboard assembly from the controller housing. This is done by pressing in the clips on each side of the handle.

      • Freeing the motherboard from the housing will provide better access to the charging port.

      Ask FixBot

      Add Comment

    4. PS3 Dual Shock 3 Controler Charging Port Replacement, Preparing the Soldering Station: step 4, image 1 of 1
      • Prepare your station for the de-soldering of the charging port.

      Ask FixBot

      Add Comment

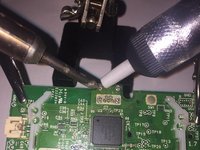
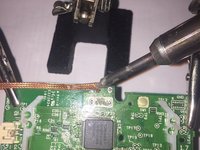
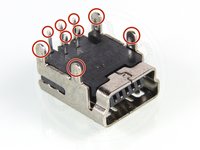
    5. PS3 Dual Shock 3 Controler Charging Port Replacement, Desoldering: step 5, image 1 of 3 PS3 Dual Shock 3 Controler Charging Port Replacement, Desoldering: step 5, image 2 of 3 PS3 Dual Shock 3 Controler Charging Port Replacement, Desoldering: step 5, image 3 of 3
      Tool used on this step:
      Desoldering Pump
      $3.99
      Buy
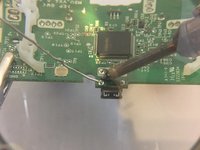
      • To remove the defective charging port, you will need to de-solder the 9 pins holding the port to the motherboard.

      • First, used the desoldering pump to remove the solder from all 9 pins.

      • Then, use the desoldering wick to remove any excess solder left on the motherboard.

      Ask FixBot

      Add Comment

    6. PS3 Dual Shock 3 Controler Charging Port Replacement, Securing New Charging Port: step 6, image 1 of 1
      • After the charging port is removed, place the new charging port into position.

      • Hold the new port in place by using a clip to keep it from moving.

      Ask FixBot

      Add Comment

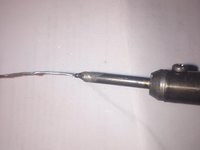
    7. PS3 Dual Shock 3 Controler Charging Port Replacement, Soldering The New Port: step 7, image 1 of 2 PS3 Dual Shock 3 Controler Charging Port Replacement, Soldering The New Port: step 7, image 2 of 2
      • Tin the soldering iron before soldering the connections. This is done by applying a small amount of solder to the tip of the hot iron.

      • Solder the 9 pin connections that connect the charging port to the motherboard.

      Ask FixBot

      Add Comment

Conclusion

To reassemble your device, follow instructions 1-3 in reverse order.

Cancel: I did not complete this guide.

18 other people completed this guide.

Attak

Member since: 12/04/17

703 Reputation

1 Guide authored

4 Guide Comments

Shall DualShock3 require other than GND and VBUS for charging only

and does DS3 follow the standards of USB-miniB (eg: Data wires flipping).

Sony does have some fame to sacrifice standards over extra capability delivery.

JanLS - Reply Share

Would you guys happen to know, if my labeling is correct? I’m going to upgrade to USB-C.

https://imgur.com/a/RL68Yw5

Howling Beats - Reply Share

Thank you it's really useful, tips,

Alan - Reply Share

Thanks for this. But now there are four different USB charging ports, how to tell which one of them is suitable? kasynparts eg

kasynlife - Reply Share

Add Comment

View Statistics:

Past 24 Hours: 11

Past 7 Days: 96

Past 30 Days: 438

All Time: 27,281