
PDP Afterglow Fener LED Replacement

Thomas Williams and 2 other contributors
Last updated on Jan 5, 2016
Views: 1.3K
View statistics:
- Past 24 Hours:
- 2
- Past 7 Days:
- 15
- Past 30 Days:
- 88
- All Time:
- 1,253
Comments: 0
No one has left comments on this guide. Will you be first?
Go to guide commentsCompleted: 1 2
1 person has marked this guide "completed." Will you be next?
2 people have marked this guide "completed." Including you — great job!
Favorites: 0 1
No one has favorited (and subscribed to) this guide. Will you be the first?
1 person has favorited (and subscribed to) this guide — and that's you!
Missing Details
Some of this guide's details are missing. Help users by adding tools, difficulty, or time.
Introduction
Go to step 1 ↓First we are going to take apart the headset to get to the LED. Then we are going to use our helping hands and soldering iron to remove the old LED and put the new LED in. WARNING advanced soldering skills needed.
What you need
Parts
Tools


-
-
-
Gently pull off your left and right ear pad. For further instructions on how to carefully do this please go to this guide here.
-
For each of the red circled screws, take your J000 screwdriver and unscrew the screws.
-
This is a picture of what your headset looks like now that you have done the first two steps and have removed the part that you unscrewed.
 Ask FixBot
-
-
-
First remove the battery from the headset, for instructions on how to do this correctly go here
-
Now take your J000 screwdriver and unscrew the screws that have a red circle around them.
-
Now remove the circuit board from the headset and flip it to the other side to be able to see the light/LED.
-
-
-
-
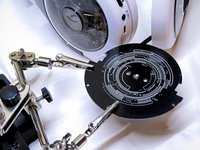
Take your helping hand with alligator clips and put the printed circuit board on it.
-
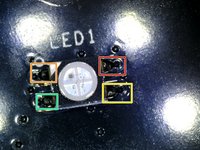
This picture is a close up of the LED with the highlighted areas you need to unsoldered.
-
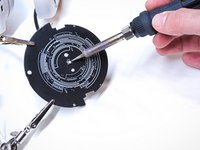
Now take your soldering iron and unsolder those four highlighted areas.
-
Your LED should come loose and you can now put on your new LED.
-
-


To reassemble your device, follow these instructions in reverse order.
Cancel: I did not complete this guide.
One other person completed this guide.

Team

UMass Dartmouth, Team 5-3, Gulbrandsen Fall 2015 Member of UMass Dartmouth, Team 5-3, Gulbrandsen Fall 2015
UMASSD-GULBRANDSEN-F15S5G3
3 Members
60 Guides authored
