
Free Shipping on Domestic Orders $75+

Ortizan X10 Motherboard Replacement

What you need

  1. Ortizan X10 Motherboard Replacement, Grille: step 1, image 1 of 2 Ortizan X10 Motherboard Replacement, Grille: step 1, image 2 of 2
    • Use an opening tool to remove the rubber end caps.

  2. Ortizan X10 Motherboard Replacement: step 2, image 1 of 3 Ortizan X10 Motherboard Replacement: step 2, image 2 of 3 Ortizan X10 Motherboard Replacement: step 2, image 3 of 3
    • Use a Phillips screwdriver to remove the four screws (two on each end).

    • Firmly grip the top of the speaker, stabilize the base, and twist the cap counterclockwise to loosen and remove. Repeat this step for the bottom cap.

  3. Ortizan X10 Motherboard Replacement: step 3, image 1 of 1
    • Insert an opening tool into the seam between the grille and body. Lift and crack it open just a little.

  4. Ortizan X10 Motherboard Replacement: step 4, image 1 of 1
    • Using your hands, pull the speaker out of the casing by holding the speaker in one hand and the shell in the other.

  5. Ortizan X10 Motherboard Replacement, Motherboard: step 5, image 1 of 3 Ortizan X10 Motherboard Replacement, Motherboard: step 5, image 2 of 3 Ortizan X10 Motherboard Replacement, Motherboard: step 5, image 3 of 3
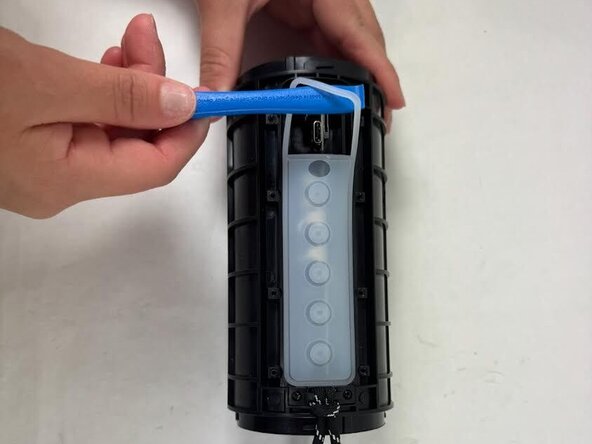
    • Lift one end of the rubber button strip with an opening tool, then peel it away from the speaker housing with your hands.

  6. Ortizan X10 Motherboard Replacement: step 6, image 1 of 1
    • Use a Phillips #00 screwdriver to remove the eight screws securing the plastic button interface.

    • Remove the button interface.

  7. Ortizan X10 Motherboard Replacement: step 7, image 1 of 3 Ortizan X10 Motherboard Replacement: step 7, image 2 of 3 Ortizan X10 Motherboard Replacement: step 7, image 3 of 3
    • Carefully shift the motherboard side to side to disengage it from the casing. JST connectors are attached—do not pull abruptly to avoid damaging the cables and connectors.

  8. Ortizan X10 Motherboard Replacement: step 8, image 1 of 2 Ortizan X10 Motherboard Replacement: step 8, image 2 of 2
    • Use tweezers to gently grip each JST connector and pull it upward to disconnect them.

    • Remove the motherboard.

Conclusion

To reassemble your device, follow the above steps in reverse order.
Take your e-waste to an R2 or e-Stewards certified recycler.
Repair didn’t go as planned? Try some basic troubleshooting or ask our Answers community for help.

One other person completed this guide.

Garnel Joseph

Member since: 03/20/25

130 Reputation

1 Guide authored

Team

0 Guide Comments

Add Comment

View Statistics:

Past 24 Hours: 0

Past 7 Days: 9

Past 30 Days: 35

All Time: 152