Free Shipping on Domestic Orders $75+

One Education Infinity:One Hinge Contact Assembly Replacement

What you need

    1. One Education Infinity:One Hinge Contact Assembly Replacement, Back Case: step 1, image 1 of 2 One Education Infinity:One Hinge Contact Assembly Replacement, Back Case: step 1, image 2 of 2
      • Use a spudger to pry the four rubber pads away from the bottom of the case.

      • Use a Phillips #00 screwdriver to unscrew the four 6.4 mm screws.

      Ask FixBot

      Add Comment

    2. One Education Infinity:One Hinge Contact Assembly Replacement: step 2, image 1 of 2 One Education Infinity:One Hinge Contact Assembly Replacement: step 2, image 2 of 2
      • Insert a Jimmy or other prying tool into the seam on the edge of the casing.

      • Trace along the edges of the device until all clips are released.

      • Lift the back case away from the device.

      Ask FixBot

      Add Comment

    3. One Education Infinity:One Hinge Contact Assembly Replacement: step 3, image 1 of 1
      • Use a Phillips #00 screwdriver to unscrew the four 6.4mm screws on the hinge mounts.

      Ask FixBot

      Add Comment

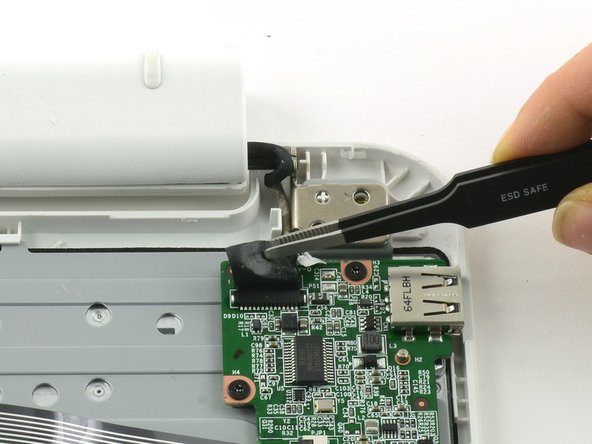
    4. One Education Infinity:One Hinge Contact Assembly Replacement: step 4, image 1 of 2 One Education Infinity:One Hinge Contact Assembly Replacement: step 4, image 2 of 2
      Tool used on this step:
      Tweezers
      $4.99
      Buy
      • Use tweezers to lift the fabric cover and hinge connector away from the daughterboard.

      • Always use ESD safe tools when working with delicate electrical components.

      Ask FixBot

      Add Comment

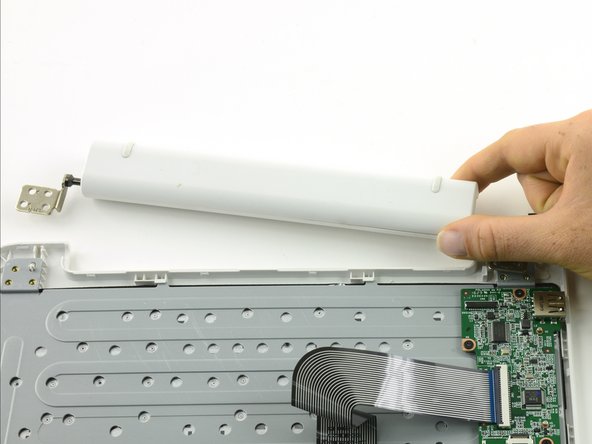
    1. One Education Infinity:One Hinge Contact Assembly Replacement, Hinge Contact Assembly: step 5, image 1 of 2 One Education Infinity:One Hinge Contact Assembly Replacement, Hinge Contact Assembly: step 5, image 2 of 2
      • Lift the hinge away from the device.

      Ask FixBot

      Add Comment

    2. One Education Infinity:One Hinge Contact Assembly Replacement: step 6, image 1 of 1
      • Use a Phillips #00 screwdriver to unscrew the two 6.5mm screws.

      Ask FixBot

      Add Comment

    3. One Education Infinity:One Hinge Contact Assembly Replacement: step 7, image 1 of 2 One Education Infinity:One Hinge Contact Assembly Replacement: step 7, image 2 of 2
      • Slide a Jimmy or other prying tool along the seam of the hinge to pry the casing apart.

      Ask FixBot

      Add Comment

    4. One Education Infinity:One Hinge Contact Assembly Replacement: step 8, image 1 of 1
      • Use a Phillips #00 screwdriver to remove the two 4.3mm screws holding the circuit board in place.

      Ask FixBot

      Add Comment

    5. One Education Infinity:One Hinge Contact Assembly Replacement: step 9, image 1 of 1
      • Use a spudger to pry the circuit board away from the casing.

      • Always use ESD safe tools when removing delicate components.

      Ask FixBot

      Add Comment

Conclusion

To reassemble your device, follow these instructions in reverse order.

Cancel: I did not complete this guide.

Taylor Bratsch

Member since: 09/06/16

6,174 Reputation

14 Guides authored

1 Guide Comment

Everything is very detailed and shown. Everything is also done in detail on this site ++https://oceanessay.com/buy-thesis-pape... , which helps students learn. There you will find a lot of educational materials.

Nathan Joyce - Reply Share

Add Comment

View Statistics:

Past 24 Hours: 0

Past 7 Days: 1

Past 30 Days: 27

All Time: 593