Free Shipping on Domestic Orders $75+

Olympus Pen E-PL7 Back Case Replacement

Views: 4.7K

View statistics:

Past 24 Hours:
3
Past 7 Days:
25
Past 30 Days:
136
All Time:
4,728
Comments: 2

2 guide comments.

Go to guide comments
Completed: 4

4 people have marked this guide "completed." Will you be next?

Favorites: 0

No one has favorited (and subscribed to) this guide. Will you be the first?

Time Required: No estimate
Difficulty: Moderate
Olympus Pen E-PL7 Back Case Replacement

Introduction

Go to step 1 ↓

Use this guide to replace a damaged back case, or open the case to access other components of your camera.

We highly suggest you use a magnetic project mat or an organization tray. This camera has many different types of screws and keeping them organized is key to proper reassembly.

What you need

Tools

    1. Olympus Pen E-PL7 Back Case Replacement, Back Case: step 1, image 1 of 1
      • Use a Phillips #00 screwdriver to remove the six 2 mm screws on the bottom of the camera.

      Ask FixBot

      Add Comment

    2. Olympus Pen E-PL7 Back Case Replacement: step 2, image 1 of 1
      • Remove the two 4 mm reverse threaded Phillips screws from the bottom of the camera.

      • Reverse threaded screws tighten counter clockwise and loosen clockwise.

      Ask FixBot

      Add Comment

    3. Olympus Pen E-PL7 Back Case Replacement: step 3, image 1 of 1
      • Remove the two 4 mm Phillips screws under the HDMI port cover.

      Ask FixBot

      Add Comment

    4. Olympus Pen E-PL7 Back Case Replacement: step 4, image 1 of 1
      • Use a Phillips #00 screwdriver to remove the 5 mm screw near the left hand grip.

      Ask FixBot

      Add Comment

    5. Olympus Pen E-PL7 Back Case Replacement: step 5, image 1 of 1
      • Use a Phillips #00 screwdriver to remove the 5 mm screw near the right hand grip.

      Ask FixBot

      Add Comment

    6. Olympus Pen E-PL7 Back Case Replacement: step 6, image 1 of 1
      • Flip open the LCD.

      • Use a Phillips #00 screwdriver to remove the 2 mm screw beneath the LCD assembly.

      Ask FixBot

      Add Comment

    7. Olympus Pen E-PL7 Back Case Replacement: step 7, image 1 of 1
      • Use a Phillips #00 screwdriver to remove the four 6.3 mm screws from the lens mount.

      Ask FixBot

      Add Comment

    8. Olympus Pen E-PL7 Back Case Replacement: step 8, image 1 of 1
      Tool used on this step:
      Tweezers
      $4.99
      Buy
      Ask FixBot

      Add Comment

    9. Olympus Pen E-PL7 Back Case Replacement: step 9, image 1 of 1
      • Use tweezers to remove the inner metal ring.

      Ask FixBot

      Add Comment

    10. Olympus Pen E-PL7 Back Case Replacement: step 10, image 1 of 2 Olympus Pen E-PL7 Back Case Replacement: step 10, image 2 of 2
      • Use tweezers to remove the two springs lying beneath the inner metal ring.

      Ask FixBot

      Add Comment

    11. Olympus Pen E-PL7 Back Case Replacement: step 11, image 1 of 1
      • Use a Phillips #00 screwdriver to remove the three 5 mm screws.

      Ask FixBot

      Add Comment

    12. Olympus Pen E-PL7 Back Case Replacement: step 12, image 1 of 1
      • Remove the two 4 mm Phillips screws.

      Ask FixBot

      Add Comment

    13. Olympus Pen E-PL7 Back Case Replacement: step 13, image 1 of 3 Olympus Pen E-PL7 Back Case Replacement: step 13, image 2 of 3 Olympus Pen E-PL7 Back Case Replacement: step 13, image 3 of 3
      • Press and hold the lens release button while using tweezers to remove the lens hook.

      • Use tweezers to remove the spring underneath the lens hook.

      Ask FixBot

      Add Comment

    14. Olympus Pen E-PL7 Back Case Replacement: step 14, image 1 of 3 Olympus Pen E-PL7 Back Case Replacement: step 14, image 2 of 3 Olympus Pen E-PL7 Back Case Replacement: step 14, image 3 of 3
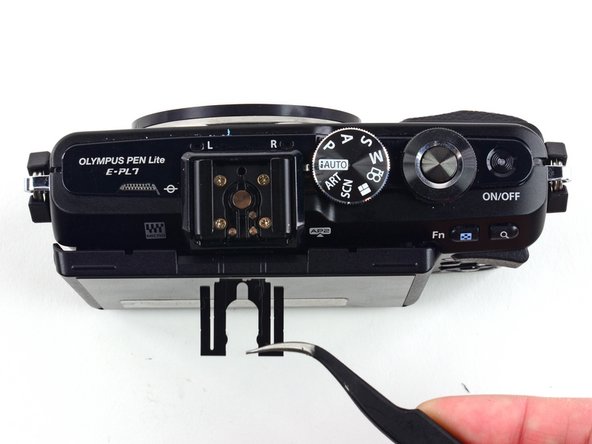
      • Use tweezers to remove the metal clip from the external flash mount.

      Ask FixBot

      Add Comment

    15. Olympus Pen E-PL7 Back Case Replacement: step 15, image 1 of 1
      • Use a Phillips #00 screwdriver to remove the four 4 mm screws from the external flash port.

      Ask FixBot

      Add Comment

    16. Olympus Pen E-PL7 Back Case Replacement: step 16, image 1 of 2 Olympus Pen E-PL7 Back Case Replacement: step 16, image 2 of 2
      • Remove the second external flash clip with tweezers.

      Ask FixBot

      Add Comment

    17. Olympus Pen E-PL7 Back Case Replacement: step 17, image 1 of 2 Olympus Pen E-PL7 Back Case Replacement: step 17, image 2 of 2
      • Remove the external flash port casing to expose five more screws.

      Ask FixBot

      Add Comment

    18. Olympus Pen E-PL7 Back Case Replacement: step 18, image 1 of 1
      • Use a Phillips #00 screwdriver to remove the two 6.4 mm screws.

      • Remove the 2 mm Phillips screw.

      Ask FixBot

      Add Comment

    19. Olympus Pen E-PL7 Back Case Replacement: step 19, image 1 of 1
      • Remove the two 3.8 mm Phillips screws from the sides of the external flash connector.

      Ask FixBot

      Add Comment

    20. Olympus Pen E-PL7 Back Case Replacement: step 20, image 1 of 1
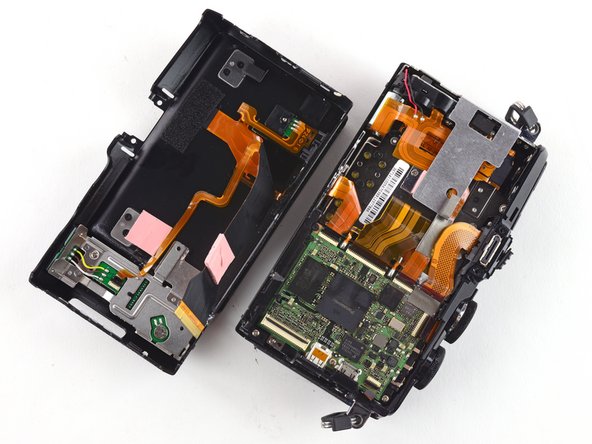
      • Gently pull the back case away from the camera.

      • Do not attempt to remove the back case, as it is attached to the camera by a ribbon cable.

      Ask FixBot

      Add Comment

    21. Olympus Pen E-PL7 Back Case Replacement: step 21, image 1 of 3 Olympus Pen E-PL7 Back Case Replacement: step 21, image 2 of 3 Olympus Pen E-PL7 Back Case Replacement: step 21, image 3 of 3
      • To remove the ribbon holding the back case to the camera, use the pointed end of a spudger to flip back the top bar on top of the ZIF connector.

      Ask FixBot

      Add Comment

    22. Olympus Pen E-PL7 Back Case Replacement: step 22, image 1 of 3 Olympus Pen E-PL7 Back Case Replacement: step 22, image 2 of 3 Olympus Pen E-PL7 Back Case Replacement: step 22, image 3 of 3
      • Use tweezers to pull the ribbon out of the connector.

      • Remove the back case.

      Ask FixBot

      Add Comment

Conclusion

To reassemble your device, follow these instructions in reverse order.

Cancel: I did not complete this guide.

4 other people completed this guide.

Kelsea Weber

Member since: 11/12/15

21,580 Reputation

32 Guides authored

2 Guide Comments

Loads of screws that don’t need to be removed just to remove the rear case.

Omit step 3,

Omit steps 6 to 13

Omit step 18

Take great care not to pull on ribbon cables

Rod Heeley - Reply Share

I should have read the comments first XD
One arm screws holding the Screen, the screws lost contact to the arm.
I did all steps, it worked perfectly!
At Step 3 the plastic parts holding the HDMI Cover fell out and I had to find out how to get it in again, but i figured it out with the good pictures here!

Thanks for that awesome work!

Christian Schmidt - Reply Share

Add Comment

View Statistics:

Past 24 Hours: 3

Past 7 Days: 25

Past 30 Days: 136

All Time: 4,728