
Nokia 3100b Microphone Replacement

Sterling Fuentes and 6 other contributors
Last updated on Jan 15, 2026
Views: 2.7K
View statistics:
- Past 24 Hours:
- 2
- Past 7 Days:
- 18
- Past 30 Days:
- 103
- All Time:
- 2,672
Comments: 0
No one has left comments on this guide. Will you be first?
Go to guide commentsCompleted: 1 2
1 person has marked this guide "completed." Will you be next?
2 people have marked this guide "completed." Including you — great job!
Favorites: 0 1
No one has favorited (and subscribed to) this guide. Will you be the first?
1 person has favorited (and subscribed to) this guide — and that's you!
Action Shots
Be an action hero! This guide needs images that better demonstrate how to perform specific actions.
Introduction
Go to step 1 ↓This step-by-step guide is designed to help you disassemble the Nokia 3100b to access and replace or inspect its microphone. The microphone is a crucial component of the phone, as it captures the sound you produce during calls, ensuring clear communication. Whether you're troubleshooting audio issues or replacing a faulty microphone, this guide will provide clear and concise instructions to navigate the process with ease.
Before beginning, ensure you have a clean, well-lit workspace and are equipped with the necessary tools for disassembly. Make sure to power off your phone, disconnect it from the charger, and remove the battery before you begin this repair.
What you need
Tools

-
-
-
Press the button on the back of the phone and slide the back panel off.
-
Remove the battery by pulling it from the phone.
-
-
-
-
Gently pull back the small metal frame holding the SIM card into place, and lift open the frame.
-
-
-
-
-
Remove the front cover from the phone.
-
Set the front cover as indicated, aside.
-
-
-
-
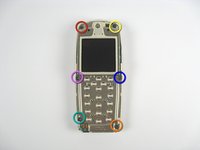
Remove the screws as they are indicated in the order of the colors of the rainbow. (Red, Orange, Yellow, Green, Blue, Purple.)
-
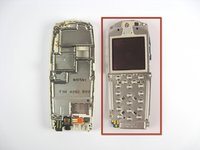
Remove the screen assembly from the phone base.
-
Set the screen assembly aside.
-
-
Tool used on this step:Tweezers$4.99
-
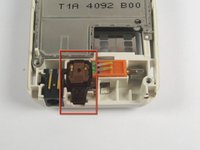
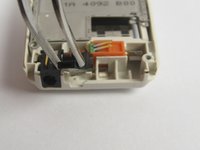
Note the location of the microphone.
-
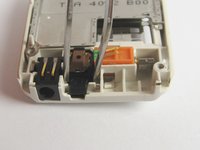
Use tweezers to remove the microphone from the phone's base.
-

 Ask FixBot




To reassemble your device, follow these instructions in reverse order. Take your e-waste to an R2 or e-Stewards certified recycler.
Cancel: I did not complete this guide.
One other person completed this guide.

Team

Cal Poly, Team 29-64, Johann Spring 2010 Member of Cal Poly, Team 29-64, Johann Spring 2010
CPSU-JOHANN-S10S29G64
3 Members
96 Guides authored
