Free Shipping on Domestic Orders $75+

Nintendo Wii Classic Controller Pro D-pad Replacement

What you need

  1. Nintendo Wii Classic Controller Pro D-pad Replacement, D-pad: step 1, image 1 of 1
    • Turn the controller over and locate the 7 screws.

    • Using the 2.5mm Y0 Tri-point screwdriver remove the screws.

    Ask FixBot

    Add Comment

  2. Nintendo Wii Classic Controller Pro D-pad Replacement: step 2, image 1 of 3 Nintendo Wii Classic Controller Pro D-pad Replacement: step 2, image 2 of 3 Nintendo Wii Classic Controller Pro D-pad Replacement: step 2, image 3 of 3
    • Now that the screws are removed, it's time to remove the back plate.

    • Rotate around the controller and carefully separate the two plates.

    • This step can be done either using your hands or with a prying tool.

    Ask FixBot

    Add Comment

  3. Nintendo Wii Classic Controller Pro D-pad Replacement: step 3, image 1 of 3 Nintendo Wii Classic Controller Pro D-pad Replacement: step 3, image 2 of 3 Nintendo Wii Classic Controller Pro D-pad Replacement: step 3, image 3 of 3
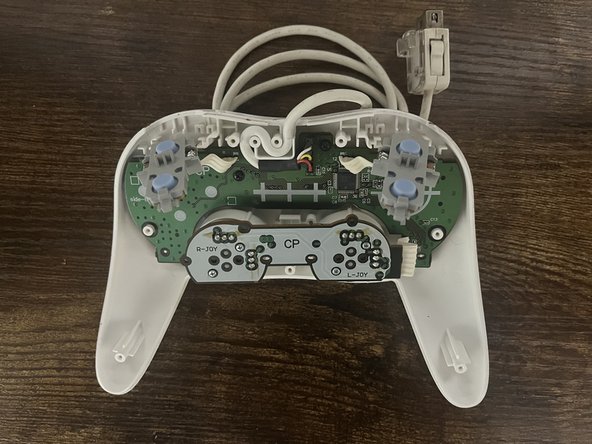
    • Focus on the front plate with the circuit board.

    • Now remove the left and right trigger buttons by tugging them out.

    Ask FixBot

    Add Comment

  4. Nintendo Wii Classic Controller Pro D-pad Replacement: step 4, image 1 of 3 Nintendo Wii Classic Controller Pro D-pad Replacement: step 4, image 2 of 3 Nintendo Wii Classic Controller Pro D-pad Replacement: step 4, image 3 of 3
    • Next is the removal of the silicone buttons.

    • Gently pull them out of their socket. When pulled out, they should just be hanging.

    Ask FixBot

    Add Comment

  5. Nintendo Wii Classic Controller Pro D-pad Replacement: step 5, image 1 of 2 Nintendo Wii Classic Controller Pro D-pad Replacement: step 5, image 2 of 2
    • Gently pull the white cord towards you to remove it from the cord holder.

    Ask FixBot

    Add Comment

  6. Nintendo Wii Classic Controller Pro D-pad Replacement: step 6, image 1 of 3 Nintendo Wii Classic Controller Pro D-pad Replacement: step 6, image 2 of 3 Nintendo Wii Classic Controller Pro D-pad Replacement: step 6, image 3 of 3
    • Locate and remove the two screws with a 2.5mm Phillps screwdriver.

    • Now gently lift up the circuit board to separate it from the front plate.

    • When reconnecting the circuit board to the front plate, pre-place the Phillips screws into the holes of the circuit board. This ensures the alignment of the two parts during reassembly.

    Ask FixBot

    Add Comment

  7. Nintendo Wii Classic Controller Pro D-pad Replacement: step 7, image 1 of 3 Nintendo Wii Classic Controller Pro D-pad Replacement: step 7, image 2 of 3 Nintendo Wii Classic Controller Pro D-pad Replacement: step 7, image 3 of 3
    • Set aside the circuit board and focus on the front plate.

    • Remove the white silicone button pad.

    • Depending on you how remove the button pad, the D-pad may either be removed along with it or will need to be removed after.

    Ask FixBot

    Add Comment

  8. Nintendo Wii Classic Controller Pro D-pad Replacement: step 8, image 1 of 3 Nintendo Wii Classic Controller Pro D-pad Replacement: step 8, image 2 of 3 Nintendo Wii Classic Controller Pro D-pad Replacement: step 8, image 3 of 3
    • Put away the old D-pad and get your new D-pad.

    • Insert the new D-pad into the D-pad socket. Ensure that the curves of the D-pad align with the small ridges of the socket.

    • Then place the white silicone button pad on top of the D-pad. The hole on the left should fit into a small tube to secure its position.

    Ask FixBot

    Add Comment

Conclusion

To reassemble your device, follow these instructions in reverse order.

Cancel: I did not complete this guide.

David R. Lopez

Member since: 10/23/23

157 Reputation

1 Guide authored

Team

0 Guide Comments

Add Comment

View Statistics:

Past 24 Hours: 5

Past 7 Days: 26

Past 30 Days: 78

All Time: 1,614