Free Shipping on Domestic Orders $75+

Nintendo GameCube Controller Directional Pad Replacement

Views: 8.2K

View statistics:

Past 24 Hours:
3
Past 7 Days:
31
Past 30 Days:
142
All Time:
8,221
Comments: 4

4 comments on steps.

Completed: 5

5 people have marked this guide "completed." Will you be next?

Favorites: 5

5 people have favorited (and subscribed to) this guide. Will you be next?

Time Required: 5 - 6 minutes
Difficulty: Easy
Featured Student Guide

This guide has been the hard work of our awesome students and is found to be exceptionally cool by the iFixit staff.

Nintendo GameCube Controller Directional Pad Replacement

Introduction

Go to step 1 ↓

This guide will demonstrate proper removal of the D-Pad. This is necessary in order to clean or replace it.

What you need

Tools

    1. Nintendo GameCube Controller Directional Pad Replacement, Back Panel: step 1, image 1 of 1
      • Place the controller (buttons down) on a solid surface.

      • Remove the six 9.2mm Tri-wing Y0 screws that hold the back panel in place.

      Ask FixBot

      Add Comment

    2. Nintendo GameCube Controller Directional Pad Replacement: step 2, image 1 of 1
      • Gently lift the back panel up, separating it from the front panel.

      • Some of the buttons may fall out if they are knocked around.

      Ask FixBot

      Add Comment

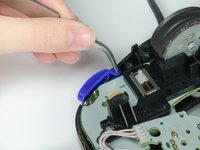
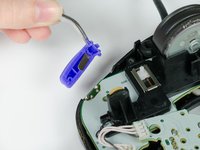
    1. Nintendo GameCube Controller Directional Pad Replacement, Z Button: step 3, image 1 of 2 Nintendo GameCube Controller Directional Pad Replacement, Z Button: step 3, image 2 of 2
      • Grab the Z-button by the peg with tweezers and lift it out of the controller.

      • During re-assembly, make sure the plastic rim and spring fit into the slot provided, or else the case will not shut.

      Ask FixBot

      Add Comment

    1. Nintendo GameCube Controller Directional Pad Replacement, Circuit Board: step 4, image 1 of 1
      • Carefully unhook the cable that is looped around the peg.

      Ask FixBot

      Add Comment

    2. Nintendo GameCube Controller Directional Pad Replacement: step 5, image 1 of 1
      • Lift the circuit board out of the controller.

      • Do not grab the rumble motor to lift the circuit board as shown in the picture. It will in many cases just remove the rumble motor. Instead, grab the edges of the board.

      Ask FixBot

      Add Comment

    1. Nintendo GameCube Controller Directional Pad Replacement, Directional Pad: step 6, image 1 of 1
      Tool used on this step:
      Tweezers
      $4.99
      Buy
      • Remove the rubber backing with tweezers.

      Ask FixBot

      Add Comment

    2. Nintendo GameCube Controller Directional Pad Replacement: step 7, image 1 of 1
      • Use tweezers to grab the center peg of the directional pad and lift it out of its socket.

      Ask FixBot

      Add Comment

Conclusion

To reassemble your device, follow these instructions in reverse order.

Cancel: I did not complete this guide.

5 other people completed this guide.

Sean Michel

Member since: 01/14/13

2,768 Reputation

8 Guides authored

Team

Cal Poly, Team 19-44, Regan Winter 2013 Member of Cal Poly, Team 19-44, Regan Winter 2013

CPSU-REGAN-W13S19G44

4 Members

108 Guides authored

0 Guide Comments

Add Comment

View Statistics:

Past 24 Hours: 3

Past 7 Days: 31

Past 30 Days: 142

All Time: 8,221