
Nintendo DS Main Circuit Board Replacement

kingdesmond and 18 other contributors
Last updated on May 7, 2024
Views: 35K
View statistics:
- Past 24 Hours:
- 10
- Past 7 Days:
- 87
- Past 30 Days:
- 348
- All Time:
- 35,111
Comments: 14
12 comments on steps, 2 guide comments.
Go to guide commentsCompleted: 24 25
24 people have marked this guide "completed." Will you be next?
25 people have marked this guide "completed." Including you — great job!
Favorites: 17 18
17 people have favorited (and subscribed to) this guide. Will you be next?
18 people have favorited (and subscribed to) this guide — including you!
Introduction
Go to step 1 ↓This is a guide that teaches how to replace a Nintendo DS motherboard also known as a circuit board.
The Nintendo DS is a video game console released by Nintendo proposing two screens working in tandem with wireless connectivity, and an integrated microphone.
The main circuit board holds and makes all communication between components of the device possible. Therefore, whenever the communication between the functioning components takes longer than expected or there is no communication, replacing the motherboard is a necessity.
The removal of the main motherboard of the DS is essential to access the screens and to replace other imperatives.
The replacement could be done in 10 simple steps.
What you need


-
-
-
Remove the cartridge from the console.
-
Use a Phillips #00 Screwdriver to remove the screw securing the battery door to the rear case.
-
Remove the battery door.
 Ask FixBot
-
-
-
Use a plastic opening tool or spudger to pry out the battery from the bottom. If a plastic opening tool or spudger isn't available, your fingernails may work.
-
-
-
-
-
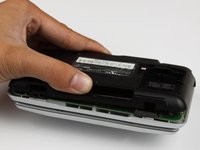
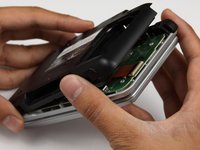
With your hands, pry the back panel off the main case.
-
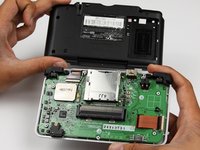
Separate the back from the front, and set it aside.
-
-
-
-
Using a Phillips #00 screwdriver, remove the four screws on the circuit board.
-
-
-
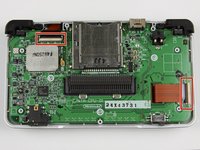
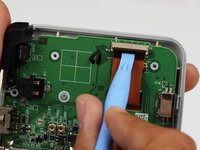
Unlock the two large ribbon cables by moving the black clip up.
-
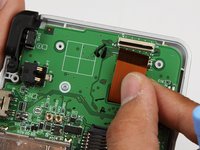
Carefully pull the ribbon cables down and out with your fingers.
-
-
-
Tool used on this step:Tweezers$4.99
-
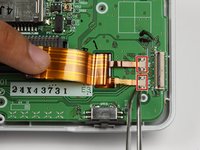
Locate the two small ribbon cables, beneath the rightmost large ribbon cable.
-
Slide the locks for the small ribbon cables down to the side, and remove the cables.
-
-
-
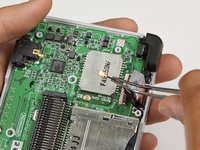
Locate the Wifi antenna pigtail connector.
-
Remove the antenna by grasping it at the head with tweezers. Using a slight rocking motion, pull up to dislodge the connector.
-
-
-
Feed the ribbon cables through the opening on the board.
-
Pull up and remove the circuit board, and set it aside.
-
-









To reassemble your device, follow these instructions in reverse order.
Cancel: I did not complete this guide.
24 other people completed this guide.

Team

Cal Poly, Team 18-3, Maness Fall 2009 Member of Cal Poly, Team 18-3, Maness Fall 2009
CPSU-MANESS-F09S18G3
4 Members
60 Guides authored
2 Guide Comments
This was really helpful. Thank you!
I need a ds ribbon bale ?
