Introduction
If your 3DS joystick is not responding, follow these steps to replace the joystick pad and get your device working again. Watch out for delicate ribbon cables in the device. There is a loose black washer in the joystick housing. Be sure not to lose it.
What you need
-
-
Unscrew the two 3mm Phillips #1 head screws along the top edge of the device.
 Ask FixBot
-
-
-
Pull the top corner tabs of the front face plate outward and towards you.
-
Pull the faceplate up and out of the slots at the bottom of the device.
-
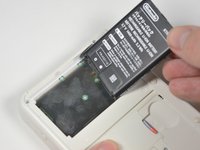
Set aside the back faceplate.
-
-
-
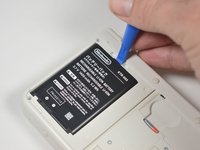
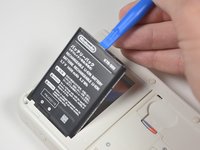
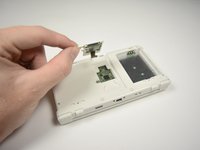
Insert a plastic opening tool into the notch at the top of the battery.
-
Pry the battery up with the plastic opening tool.
-
-
-
Unscrew the three 3mm Y0 screws along the right and bottom of the SD card reader.
-
-
-
-
Pull the SD card reader from the edge with two holes gently to free the tab at the top of the SD card reader.
-
Reorient the device so that the power jack faces you.
-
-
-
Lift the SD card reader gently.
-
Use a plastic opening tool to pry the SD card ribbon cable off the socket on the motherboard.
-
Lift the SD card reader out off of the lower casing.
-
-
Tool used on this step:Tweezers$4.99
-
Reorient the device so that the game slot now faces you.
-
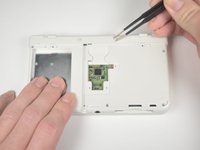
Remove the two rubber bumpers along the top of the device using tweezers.
-
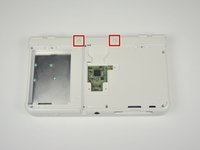
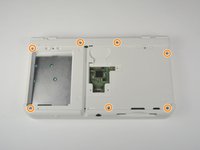
Unscrew the seven 6mm Phillips #00 screws along the top and bottom of the 3DS.
-
-
-
Lift the top edge of the lower case slightly off on the 3DS.
-
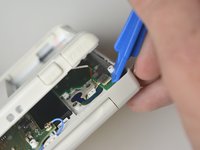
Pry the ribbon cable socket under the right trigger using a plastic opening tool.
-
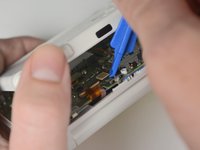
Pry the ribbon cable socket under the infrared receiver cover using a plastic opening tool.
-
-
-
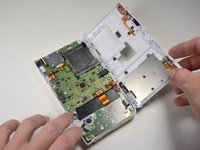
Open the device slowly from its top edge. Be careful not to tug the ribbon cable connected near the bottom edge of the device.
-
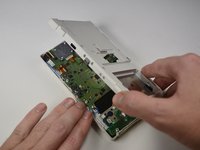
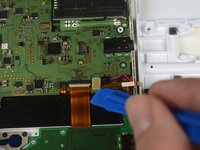
Pry the last ribbon cable attached to the lower case using a plastic opening tool.
-
-
-
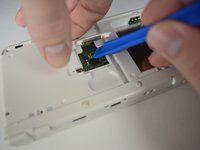
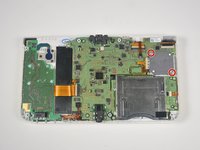
Locate the joystick assembly near the top right corner of the motherboard.
-
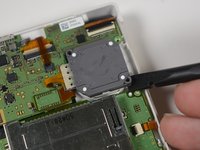
Remove the two 8mm Phillips #00 screws from the back of the joystick.
-
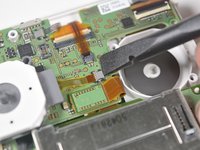
Use the flat end of the spudger to pry off the joystick pad from its plastic housing.
-
-
-
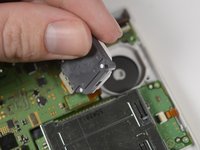
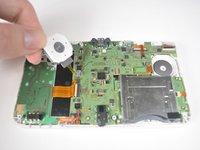
Lift the joystick pad and place it on its back. This will reveal the ribbon cable connected to the joystick pad.
-
Use the flat end of the spudger to pry up the retaining flap for the ribbon cable.
-
Lift the joystick out of the device.
-


To reassemble your device, follow these instructions in reverse order.
Cancel: I did not complete this guide.
6 other people completed this guide.
Team

Cal Poly, Team 4-6, Livingston Fall 2016 Member of Cal Poly, Team 4-6, Livingston Fall 2016
CPSU-LIVINGSTON-F16S4G6
4 Members
46 Guides authored
4 Guide Comments
thank you for the help
Great, detailed tutorial. Was able to sucessfully unscrew my housing of the 3ds. I am currently fixing my circle pad.
Tutorial worked wonderfully, now have a fantastic feeling circle pad on the used N3DS I picked up.
Hi - can some steps be added to replace the actual joystick part of the circle pad? Thanks!