Free Shipping on Domestic Orders $75+

Nikon D80 Flash Assembly Replacement

Views: 3.2K

View statistics:

Past 24 Hours:
2
Past 7 Days:
21
Past 30 Days:
133
All Time:
3,169
Comments: 0

No one has left comments on this guide. Will you be first?

Go to guide comments
Completed: 0

No one has marked this guide "completed." Will you be the first?

Favorites: 0

No one has favorited (and subscribed to) this guide. Will you be the first?

Time Required: 35 minutes
Difficulty: Difficult
Nikon D80 Flash Assembly Replacement

Introduction

Go to step 1 ↓

After extended use, bulbs often burn out. Replace the flash assembly using this guide. For safety purposes, please remove the battery before working with any electronic components.

Please note that this guide requires soldering. For more information on how to solder and desolder connections, please visit this guide.

What you need

Tools

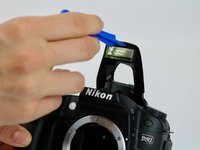
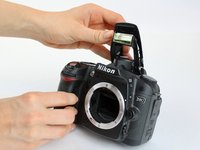
    1. Nikon D80 Flash Assembly Replacement, Flash Assembly: step 1, image 1 of 3 Nikon D80 Flash Assembly Replacement, Flash Assembly: step 1, image 2 of 3 Nikon D80 Flash Assembly Replacement, Flash Assembly: step 1, image 3 of 3
      • Press the highlighted button to pop the flash up.

      • Otherwise, use a plastic opening tool to gently lever open the flash by inserting the tool into the gap between the flash and the camera.

      Ask FixBot

      Add Comment

    2. Nikon D80 Flash Assembly Replacement: step 2, image 1 of 1
      • Use the #00 Phillips-head screwdriver to remove both 4.20 mm screws by rotating the screwdriver to the left.

      Ask FixBot

      Add Comment

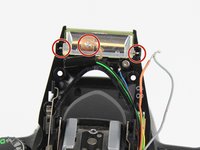
    3. Nikon D80 Flash Assembly Replacement: step 3, image 1 of 2 Nikon D80 Flash Assembly Replacement: step 3, image 2 of 2
      • Using a plastic opening tool, pry open the cover.

      • Be advised, some plastic struts may snap off when you remove the cover.

      Ask FixBot

      Add Comment

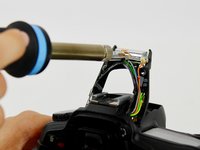
    4. Nikon D80 Flash Assembly Replacement: step 4, image 1 of 2 Nikon D80 Flash Assembly Replacement: step 4, image 2 of 2
      • Using a soldering iron, desolder the orange, tan, and gray wires from the flash assembly.

      • For more information on how to solder and desolder connections, please visit this guide.

      • Use caution while using the hot soldering iron.

      Ask FixBot

      Add Comment

    5. Nikon D80 Flash Assembly Replacement: step 5, image 1 of 1
      • Gently remove the flash assembly from the casing.

      • The surface may still be hot, so grab it with caution.

      Ask FixBot

      Add Comment

Conclusion

To reassemble your device, follow these instructions in reverse order.

Cancel: I did not complete this guide.

Kevin Horwedel

Member since: 10/09/17

211 Reputation

1 Guide authored

Team

USF Tampa, Team S1-G1, Leahy Fall 2017 Member of USF Tampa, Team S1-G1, Leahy Fall 2017

USFT-LEAHY-F17S1G1

4 Members

60 Guides authored

0 Guide Comments

Add Comment

View Statistics:

Past 24 Hours: 2

Past 7 Days: 21

Past 30 Days: 133

All Time: 3,169