Free Shipping on Domestic Orders $75+

Nexus S Rear Camera Replacement

What you need

    1. Nexus S Rear Camera Replacement, Rear Panel: step 1, image 1 of 1
      • Gently insert a plastic opening tool between the rear panel and the inner rear frame near the rear-facing camera.

      • Use your plastic opening tool to pry up the rear case around the perimeter of the Nexus S.

      Ask FixBot

      Add Comment

    2. Nexus S Rear Camera Replacement: step 2, image 1 of 1
      • Remove the rear panel from the Nexus S.

      Ask FixBot

      Add Comment

    1. Nexus S Rear Camera Replacement, Battery: step 3, image 1 of 1
      • Using the edge of a plastic opening tool, lift the battery from the end closest to the headphone jack.

      • Remove the battery from the Nexus S.

      Ask FixBot

      Add Comment

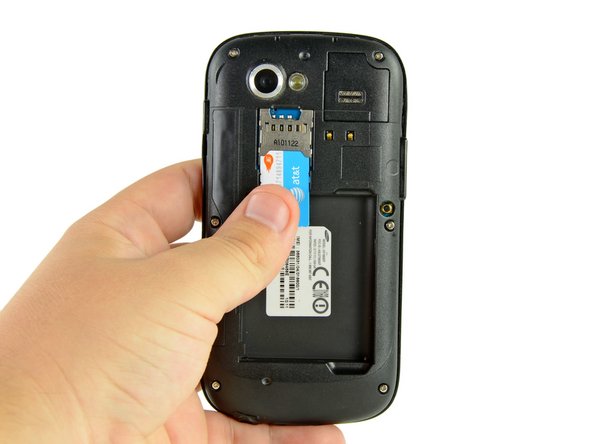
    1. Nexus S Rear Camera Replacement, SIM Card: step 4, image 1 of 2 Nexus S Rear Camera Replacement, SIM Card: step 4, image 2 of 2
      • Use your thumb to slide the SIM card downwards from the SIM card slot.

      • Remove the SIM card.

      Ask FixBot

      Add Comment

    1. Nexus S Rear Camera Replacement, Rear Inner Frame: step 5, image 1 of 1
      • Remove the six Phillips screws securing the rear inner frame to the inner case.

      Ask FixBot

      Add Comment

    2. Nexus S Rear Camera Replacement: step 6, image 1 of 1
      • Insert the flat edge of a plastic opening tool in between the rear inner frame and the top left corner of the Nexus S.

      • Pry the opening tool upwards to pop the top right corner from the clips securing it to the inner assembly.

      Ask FixBot

      Add Comment

    3. Nexus S Rear Camera Replacement: step 7, image 1 of 2 Nexus S Rear Camera Replacement: step 7, image 2 of 2
      • Insert the plastic opening tool to the right of the power button.

      • Slide the plastic opening tool downwards along the perimeter of the Nexus S to release the clips on the right side.

      Ask FixBot

      Add Comment

    4. Nexus S Rear Camera Replacement: step 8, image 1 of 2 Nexus S Rear Camera Replacement: step 8, image 2 of 2
      • In the same manner as previously described, release the bottom clips located near the bottom of the Nexus S.

      Ask FixBot

      Add Comment

    5. Nexus S Rear Camera Replacement: step 9, image 1 of 1
      • Insert and pry the plastic opening tool to release the final clip securing the rear inner frame to the inner assembly.

      Ask FixBot

      Add Comment

    6. Nexus S Rear Camera Replacement: step 10, image 1 of 1
      • Lift and remove the rear inner frame from the Nexus S.

      Ask FixBot

      Add Comment

    1. Nexus S Rear Camera Replacement, SIM Card Board: step 11, image 1 of 1
      • Use the flat edge of a plastic opening tool to pry the SIM Board connector off its socket on the motherboard.

      Ask FixBot

      Add Comment

    2. Nexus S Rear Camera Replacement: step 12, image 1 of 3 Nexus S Rear Camera Replacement: step 12, image 2 of 3 Nexus S Rear Camera Replacement: step 12, image 3 of 3
      • Wedge the edge of a plastic opening tool underneath the SIM Card board and motherboard.

      • Pry the clips located near the right bottom edge of the SIM Card board up off the motherboard.

      • Repeat the process all along the bottom perimeter of the SIM Card board until all clips have been disengaged.

      Ask FixBot

      Add Comment

    3. Nexus S Rear Camera Replacement: step 13, image 1 of 1
      • Lift and remove the SIM Card board out of the Nexus S.

      Ask FixBot

      Add Comment

    1. Nexus S Rear Camera Replacement, Motherboard: step 14, image 1 of 1
      • Insert the flat edge of a plastic opening tool underneath the headphone jack connector and pry upwards.

      Ask FixBot

      Add Comment

    2. Nexus S Rear Camera Replacement: step 15, image 1 of 1
      • Repeat the same procedure as the previous step to disconnect the digitizer connector.

      Ask FixBot

      Add Comment

    3. Nexus S Rear Camera Replacement: step 16, image 1 of 1
      • Use a plastic opening tool to pry the speaker connector (highlighted in red) from its socket on the motherboard.

      • Remove the three Phillips screws securing the motherboard to the inner assembly.

      Ask FixBot

      Add Comment

    4. Nexus S Rear Camera Replacement: step 17, image 1 of 1
      • Lift and remove the motherboard from the Nexus S, minding any cables that may get caught.

      Ask FixBot

      Add Comment

    1. Nexus S Rear Camera Replacement, Rear Camera: step 18, image 1 of 2 Nexus S Rear Camera Replacement, Rear Camera: step 18, image 2 of 2
      • Use the edge of plastic opening tool to flip up the rear facing camera ZIF connector.

      Ask FixBot

      Add Comment

    2. Nexus S Rear Camera Replacement: step 19, image 1 of 1
      Tool used on this step:
      Tweezers
      $4.99
      Buy
      • Use a pair of tweezers to lift and remove the rear camera from the motherboard.

      Ask FixBot

      Add Comment

Conclusion

To reassemble your device, follow these instructions in reverse order.

Cancel: I did not complete this guide.

7 other people completed this guide.

0 Guide Comments

Add Comment

View Statistics:

Past 24 Hours: 1

Past 7 Days: 7

Past 30 Days: 46

All Time: 3,823