
Motorola Razr 2024 Front Screen Replacement

Last updated on Sep 5, 2026
Views: 158
View statistics:
- Past 24 Hours:
- 6
- Past 7 Days:
- 29
- Past 30 Days:
- 141
- All Time:
- 158
Comments: 0
No one has left comments on this guide. Will you be first?
Go to guide commentsCompleted: 0 1
No one has marked this guide "completed." Will you be the first?
1 person has marked this guide "completed." It's you — great job!
Favorites: 0 1
No one has favorited (and subscribed to) this guide. Will you be the first?
1 person has favorited (and subscribed to) this guide — and that's you!
Community-Contributed Guide
An awesome member of our community made this guide. It was not created by iFixit staff.
Introduction
Go to step 1 ↓Replacing the front screen after my kid dropped and cracked it
What you need
Tools
-
Spudger4.9
-
-


-
-
-
Use the suction cup and spudger to begin prying up the front screen. The service manual suggests starting from the top left corner as shown.
-
Finish prying up the screen. As mentioned in the service manual, do not insert the spudger more than 2 mm to prevent hitting internal components
 Ask FixBot
-
-
-
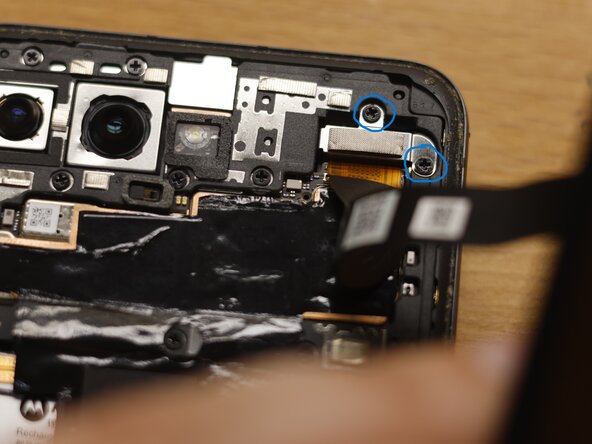
Remove these two screws that are securing the CLI BTB Bracket
-
Remove the CLI Display Module BtB Connector from the Main PCB by gently prying with a tweezers
-
-
-
If your new screen did not include camera bezels, remove them from the old screen. You may find it useful to pry this part off with the spudger. Keep track of which camera bezel is which. They are not identical.
-
-
-
Carefully reattach the cable and replace the CLI BTB Bracket
-
-
-
Test the screen functionality before applying adhesive
-
-
-
-
Apply adhesive to the inside edge of the screen and carefully push it back into place
-
-



To reassemble your device, follow these instructions in reverse order.

