
Motorola Moto G7 Plus Screen Replacement

Xander Wallace and 10 other contributors
Last updated on May 15, 2023
Views: 13K
View statistics:
- Past 24 Hours:
- 3
- Past 7 Days:
- 30
- Past 30 Days:
- 141
- All Time:
- 12,986
Comments: 20
7 comments on steps, 13 guide comments.
Go to guide commentsCompleted: 10 11
10 people have marked this guide "completed." Will you be next?
11 people have marked this guide "completed." Including you — great job!
Favorites: 1 2
1 person has favorited (and subscribed to) this guide. Will you be next?
2 people have favorited (and subscribed to) this guide — including you!
Introduction
Go to step 1 ↓If you want to perform advanced repairs on the Motorola Moto G7 Plus (model XT1965), you will likely need to remove the screen first. This guide will show you how to quickly and easily do so. If additionally you want to replace the screen, follow the steps of this guide in reverse using a new screen and adhesive as necessary.
Before you begin, download the Rescue and Smart Assistant app to backup your device and diagnose whether your problem is software or hardware related.
If you are removing a shattered screen, applying force may cause glass shards to pop off. Be gentle and, if necessary, use eye protection.
There are some required tools that are listed below. Ensure the phone is turned off before beginning.
What you need
Tools
-
-
Spudger4.9


-
-
-
Insert an opening tool pick under the screen, starting at the top of the phone.
-
Slide the pick around the entire perimeter of the display to break the adhesive.
-
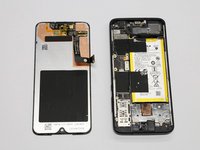
Once enough adhesive has been removed, you should be able to separate the screen by gently lifting it from the left side of the phone.
 Ask FixBot
-
-
-
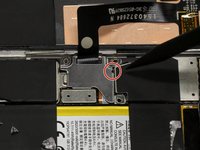
Remove the three 2.7 mm screws that surround the base of the display cable using the Torx T5 screwdriver.
-
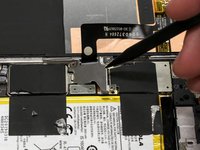
Gently remove the metal piece that covers the base of the display cable.
-
-
-
-
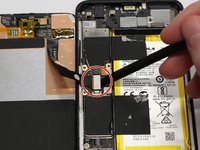
Underneath this metal piece is the base of the cable. Use a spudger to vertically lift the connection out of its port.
-
-




To reassemble your device, follow these instructions in reverse order.
Cancel: I did not complete this guide.
10 other people completed this guide.

Team

Cal Poly, Team S22-G5, Regan Winter 2020 Member of Cal Poly, Team S22-G5, Regan Winter 2020
CPSU-REGAN-W20S22G5
5 Members
60 Guides authored
13 Guide Comments
Althrough a simple fix, one should be weary if the glass is shattered. I just did this, and there were a few spliters left on the adhesive, and of course sticking to it. So if you want to replace your screen due to broken glass, make sure to wear protection and remove the splinters carefully, otherwise you may be tempted to press on the new display to strongly, because you want to stick it to the whole brim.
I completed this fix, and it wasn’t too bad. Just watch out when gluing back the screen not to put glue over the microphone hole at the bottom. This would be the phone microphone mouthpiece, you can see a small notch on the bottom of the screen, beside the “motorola” “m” on the front . I put glue there without knowning and the microphone is now very muted.
What can I do if I broke the cable connected to the back
i recently brought a mot g 7 screen replacement and followed the steps and the screen still doesn’t turn on
