Free Shipping on Domestic Orders $75+

Motorola Droid RAZR HD Rear Facing Camera Replacement

What you need

    1. Motorola Droid RAZR HD Rear Facing Camera Replacement, Front Panel Assembly: step 1, image 1 of 1
      • Power off the device before disassembly to avoid damage or harm from electrical surges.

      • Remove the two 4.5mm screws in the bottom left and right corners of the device using a T4 Torx Screwdriver.

      Ask FixBot

      Add Comment

    2. Motorola Droid RAZR HD Rear Facing Camera Replacement: step 2, image 1 of 1
      • Holding the device in your hand, push the screen towards the top of the phone until it disconnects from the base of the phone.

      Ask FixBot

      Add Comment

    3. Motorola Droid RAZR HD Rear Facing Camera Replacement: step 3, image 1 of 1
      • Use a plastic opening tool to lift the screen from the phone.

      • Do not try to completely detach the screen; cables are still connected to the device and can be damaged.

      Ask FixBot

      Add Comment

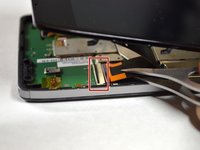
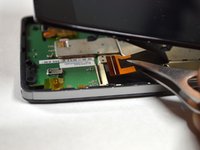
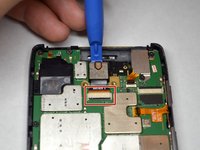
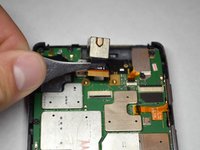
    4. Motorola Droid RAZR HD Rear Facing Camera Replacement: step 4, image 1 of 2 Motorola Droid RAZR HD Rear Facing Camera Replacement: step 4, image 2 of 2
      Tool used on this step:
      Tweezers
      $4.99
      Buy
      • Use tweezers to remove the yellow tape covering the lcd/digitizer cable connector.

      • Carefully lift up the black locking tab to release the lcd/digitizer cable.

      • The cable connector is located on the bottom right section of the phone.

      Ask FixBot

      Add Comment

    5. Motorola Droid RAZR HD Rear Facing Camera Replacement: step 5, image 1 of 1
      • Lift up the screen further to reveal another cable at the top of the device connecting the motherboard to the screen.

      • This connector is located on the top right section of the phone.

      • Use tweezers to lift the black bar on top of the ZIF connector.

      • Pull the ribbon cable out of the connector with tweezers.

      • Now that there are no cables connecting the screen to the motherboard, remove the screen.

      Ask FixBot

      Add Comment

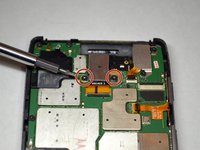
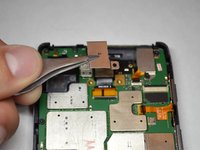
    1. Motorola Droid RAZR HD Rear Facing Camera Replacement, Rear Facing Camera: step 6, image 1 of 2 Motorola Droid RAZR HD Rear Facing Camera Replacement, Rear Facing Camera: step 6, image 2 of 2
      Tool used on this step:
      Tweezers
      $4.99
      Buy
      • Remove the two 3.5mm Torx T4 screws securing the rear facing camera.

      • Using tweezers, remove the metal shield protecting the rear facing camera.

      Ask FixBot

      Add Comment

    2. Motorola Droid RAZR HD Rear Facing Camera Replacement: step 7, image 1 of 2 Motorola Droid RAZR HD Rear Facing Camera Replacement: step 7, image 2 of 2
      • Use a plastic opening tool to lift up the rear camera.

      • Use tweezers to lift and unlock the black bar on top of the rear camera's ZIF connector.

      • Pull the camera out of the connector.

      • You will need to unplug the rear camera from its connector on the motherboard.

      Ask FixBot

      Add Comment

Conclusion

To reassemble your device, follow these instructions in reverse order.

Cancel: I did not complete this guide.

3 other people completed this guide.

Ryan Meinhardt

Member since: 04/14/15

361 Reputation

1 Guide authored

Team

Cal Poly, Team 4-4, Maness Spring 2015 Member of Cal Poly, Team 4-4, Maness Spring 2015

CPSU-MANESS-S15S4G4

5 Members

72 Guides authored

0 Guide Comments

Add Comment

View Statistics:

Past 24 Hours: 0

Past 7 Days: 2

Past 30 Days: 26

All Time: 846