Monster DNA Wire Replacement

Kevin Costello and 4 other contributors
Last updated on May 19, 2017
Views: 4.6K
View statistics:
- Past 24 Hours:
- 3
- Past 7 Days:
- 19
- Past 30 Days:
- 105
- All Time:
- 4,615
Comments: 3
1 comment on steps, 2 guide comments.
Go to guide commentsCompleted: 1 2
1 person has marked this guide "completed." Will you be next?
2 people have marked this guide "completed." Including you — great job!
Favorites: 0 1
No one has favorited (and subscribed to) this guide. Will you be the first?
1 person has favorited (and subscribed to) this guide — and that's you!
Introduction
Go to step 1 ↓If your Monster DNA headphones are playing noise out of only one side then it is likely that there is a loose wire and this will need to be soldered. This happens frequently because small tensions on the wire can loosen the solder joints easily. To do so, you must disassemble the earpiece and reattach the wires.
What you need
Tools


-
-
-
Use a Phillips #2 screwdriver to unscrew the three 5mm screws that secure the speaker cover.
-
-
-
-
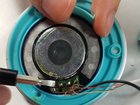
Once the loose wire or wires are located on the back of the speaker, use a soldering iron to attach the loose wire back onto the speaker.
-

 Ask FixBot


To reassemble your device, follow these instructions in reverse order.
Cancel: I did not complete this guide.
One other person completed this guide.

Team

UMass Dartmouth, Team S4-G5, Julie Spring 2017 Member of UMass Dartmouth, Team S4-G5, Julie Spring 2017
UMASSD-JULIE-S17S4G5
4 Members
36 Guides authored
2 Guide Comments
any ways on being able to know which side its on in particular without having to open both sides?
I broke the plate which holds the ear muffs on, by following these directions.
On Step 3, you have the spudger in the wrong location. You are supposed to put the prying bar or spudger before or after the silver ring which acts as a spacer for the speaker housing. I like to pry in the space between the silver ring and the audio jack.
Pics look good but you will have replace the one in step 3 showing the correct location to pry from. Others too will brake the same ring I did hence your warning about damage to the headphones if applying too much pressure.
Dan
