
Model O- Mouse Cable Replacement

Theo SW and 2 other contributors
Last updated on May 7, 2024
Views: 14K
View statistics:
- Past 24 Hours:
- 5
- Past 7 Days:
- 37
- Past 30 Days:
- 139
- All Time:
- 14,487
Comments: 5
3 comments on steps, 2 guide comments.
Go to guide commentsCompleted: 4 5
4 people have marked this guide "completed." Will you be next?
5 people have marked this guide "completed." Including you — great job!
Favorites: 0 1
No one has favorited (and subscribed to) this guide. Will you be the first?
1 person has favorited (and subscribed to) this guide — and that's you!
Featured Student Guide
This guide has been the hard work of our awesome students and is found to be exceptionally cool by the iFixit staff.
Introduction
Go to step 1 ↓If your mouse is intermittently disconnecting, randomly missing movements and inputs - you might have a broken or damaged mouse cable. The mouse cable carries data from the mouse to your computer. A damaged cable can result in missed mouse movements and inputs. Before starting this guide try a different connector (most likely USB) port on your computer, and inspect the connector for dirt and debris.
This guide shows an easy, step-by-step process on how to replace the mouse cable in a Glorious Model O- mouse.
The mouse should be physically unplugged from your computer prior to beginning your repair.
What you need
Tools
-
Tweezers4.9


-
-
Tool used on this step:Tweezers$4.99
-
Turn the mouse over so that the feet are facing you.
-
Remove the bottom two mouse feet using tweezers.
 Ask FixBot
-
-
-
Using a Phillips #0 screwdriver, remove the two screws that are under the mouse feet.
-
-
-
Slide the base away from the top housing to avoid the front clips.
-
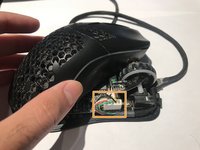
Lift the top and place it down diagonal over the base, exposing the 5-pin connector.
-
-
-
Use two fingers to grasp the top of the 5-pin connector under the edges and slowly lift the connector. If it is difficult, wiggle the plug slightly.
-
Remove the cable from around the circuit board and from the hole on the front of the mouse.
-
-
-
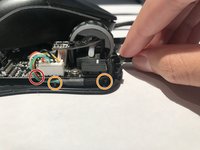
Insert the new cable's 5-pin connector plug (red) into the 5-pin connector socket (orange).
-
-
-
Route the new cable through the slit in the circuit board.
-
Route the new cable behind the pillars.
-
Route the cable through the hole at the front of the mouse. Some cables have a fitted square plastic piece that positions the cable, some have thermoplastic which requires the user to position it themselves.
-
-
-
-
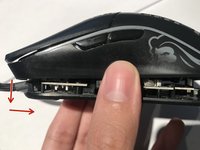
Join the top and bottom housing together with the top around 1cm ahead of the bottom, then pull the top housing back as illustrated.
-
Once the two sides of the shell are together apply pressure until at least one screw is securely fastening them together.
-
-








Cancel: I did not complete this guide.
4 other people completed this guide.

Team

York University, Team S2-G24, O'Regan Winter 2021 Member of York University, Team S2-G24, O'Regan Winter 2021
YORK-O'REGAN-W21S2G24
1 Member
12 Guides authored
