Free Shipping on Domestic Orders $75+

Microsoft Zune HD Lower Rear Panel Replacement

What you need

  1. Microsoft Zune HD Lower Rear Panel Replacement, Upper Rear Panel: step 1, image 1 of 1
    • Remove the four Tri-Wing screws securing the upper rear panel to the inner chassis.

    Ask FixBot

    Add Comment

  2. Microsoft Zune HD Lower Rear Panel Replacement: step 2, image 1 of 2 Microsoft Zune HD Lower Rear Panel Replacement: step 2, image 2 of 2
    • Slightly rotate the top edge of the upper rear panel away from the Zune.

    • Lift the upper rear panel straight up off the black plastic lower rear panel.

    Ask FixBot

    Add Comment

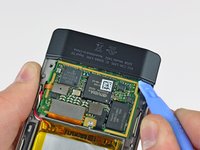
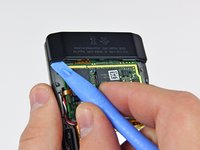
  3. Microsoft Zune HD Lower Rear Panel Replacement, Lower Rear Panel: step 3, image 1 of 2 Microsoft Zune HD Lower Rear Panel Replacement, Lower Rear Panel: step 3, image 2 of 2
    • Insert a small Zune opening tool into the gap between the logic board and one side of the black plastic lower rear panel.

    • Carefully twist the Zune opening tool to pop the lower rear panel off the clips attaching it to the Zune.

    • Repeat this process for the other side of the lower rear panel.

    Ask FixBot

    Add Comment

  4. Microsoft Zune HD Lower Rear Panel Replacement: step 4, image 1 of 1
    • Carefully slide the lower rear panel away from the Zune.

    Ask FixBot

    Add Comment

Conclusion

To reassemble your device, follow these instructions in reverse order.

Cancel: I did not complete this guide.

One other person completed this guide.

1 Guide Comment

I followed these instructions and now that lower cover will not snap back in place 😒

Robert Rank - Reply Share

Add Comment

View Statistics:

Past 24 Hours: 1

Past 7 Days: 7

Past 30 Days: 33

All Time: 3,613