Free Shipping on Domestic Orders $75+

Microsoft Surface Pro 7+ Kickstand Replacement

Views: 320

View statistics:

Past 24 Hours:
1
Past 7 Days:
15
Past 30 Days:
85
All Time:
320
Comments: 0

No one has left comments on this guide. Will you be first?

Go to guide comments
Completed: 0

No one has marked this guide "completed." Will you be the first?

Favorites: 0

No one has favorited (and subscribed to) this guide. Will you be the first?

Time Required: 10 - 15 minutes
Difficulty: Moderate
Microsoft Surface Pro 7+ Kickstand Replacement

Introduction

Go to step 1 ↓

Follow this guide to replace a broken or damaged kickstand on your Surface Pro 7+ tablet.

What you need

Parts

Tools

    1. Microsoft Surface Pro 7+ Kickstand Replacement, Before you begin: step 1, image 1 of 1
      • Before starting your repair, unplug all cables and fully shut down your Surface Pro.

      Ask FixBot

      Add Comment

    1. Microsoft Surface Pro 7+ Kickstand Replacement, Open the kickstand: step 2, image 1 of 2 Microsoft Surface Pro 7+ Kickstand Replacement, Open the kickstand: step 2, image 2 of 2
      • Open the kickstand to about 90 degrees.

      Ask FixBot

      Add Comment

    1. Microsoft Surface Pro 7+ Kickstand Replacement, Remove the kickstand screws: step 3, image 1 of 3 Microsoft Surface Pro 7+ Kickstand Replacement, Remove the kickstand screws: step 3, image 2 of 3 Microsoft Surface Pro 7+ Kickstand Replacement, Remove the kickstand screws: step 3, image 3 of 3
      • While holding the kickstand behind the hinge with your finger, use a Torx Plus 3IP screwdriver to remove the two 2.7 mm‑long screws from each hinge (four total).

      • Make sure the screws don't fall into the hinge cutouts.

      Ask FixBot

      Add Comment

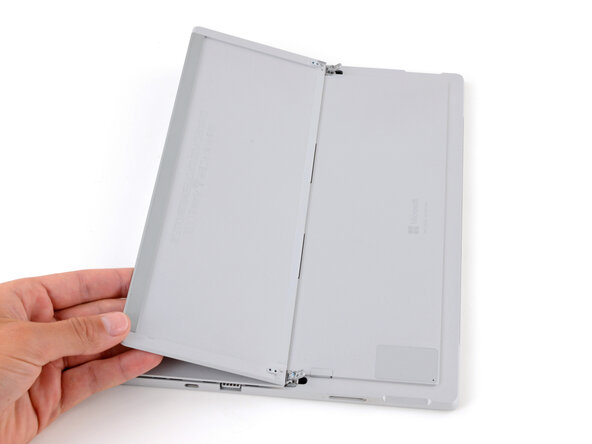
    2. Microsoft Surface Pro 7+ Kickstand Replacement, Lay the kickstand down: step 4, image 1 of 2 Microsoft Surface Pro 7+ Kickstand Replacement, Lay the kickstand down: step 4, image 2 of 2
      • Lay the kickstand down towards the top of the device so it's lying flat.

      Ask FixBot

      Add Comment

    3. Microsoft Surface Pro 7+ Kickstand Replacement, Reposition the hinges: step 5, image 1 of 3 Microsoft Surface Pro 7+ Kickstand Replacement, Reposition the hinges: step 5, image 2 of 3 Microsoft Surface Pro 7+ Kickstand Replacement, Reposition the hinges: step 5, image 3 of 3
      • Wrap your finger in a clean cloth and push both hinges down to about 30 degrees.

      Ask FixBot

      Add Comment

    4. Microsoft Surface Pro 7+ Kickstand Replacement, Flip the kickstand over: step 6, image 1 of 2 Microsoft Surface Pro 7+ Kickstand Replacement, Flip the kickstand over: step 6, image 2 of 2
      • Flip the kickstand towards the bottom of the device so it's resting on the hinges.

      Ask FixBot

      Add Comment

    5. Microsoft Surface Pro 7+ Kickstand Replacement, Remove the kickstand: step 7, image 1 of 2 Microsoft Surface Pro 7+ Kickstand Replacement, Remove the kickstand: step 7, image 2 of 2
      • Firmly secure the device to your work surface with one hand, and use your free hand to pull the kickstand out until both foam tabs slide out.

      • If you're having trouble, make sure the kickstand isn't getting stuck on the hinges—it should slide out fairly easily.

      Ask FixBot

      Add Comment

Conclusion

To reassemble your device, follow these instructions in reverse order.

Repair didn’t go as planned? Try some basic troubleshooting, or ask our Answers community for help.

Cancel: I did not complete this guide.

Spencer Day

Member since: 09/14/22

207,035 Reputation

1,266 Guides authored

0 Guide Comments

Add Comment

View Statistics:

Past 24 Hours: 1

Past 7 Days: 15

Past 30 Days: 85

All Time: 320