
Microsoft Surface 2 Volume Control Replacement

oluchianya and 3 other contributors
Last updated on May 7, 2024
Views: 2.2K
View statistics:
- Past 24 Hours:
- 3
- Past 7 Days:
- 13
- Past 30 Days:
- 96
- All Time:
- 2,207
Comments: 5
5 comments on steps.
Completed: 0 1
No one has marked this guide "completed." Will you be the first?
1 person has marked this guide "completed." It's you — great job!
Favorites: 1 2
1 person has favorited (and subscribed to) this guide. Will you be next?
2 people have favorited (and subscribed to) this guide — including you!
Introduction
Go to step 1 ↓If your volume control button has been getting stuck or malfunctioning, it is very likely that it needs to be replaced. This guide is a step by step process on how to go about fixing it.
What you need
Tools


-
-
-
Begin by using a heat gun or the iOpener (This will take longer.) to melt the adhesive all around the outer edge of the screen.
-
Insert the opening picks just under the screen and black edging. Be sure to place them evenly on each side.
-
Using the gap created by the picks, slowly pry the screen from the body of the Microsoft Surface 2 with a plastic opening tool. Pry as uniformly as possible.
 Ask FixBot
-
-
-
Use a plastic spudger to pry the retaining clip away from the display cable.
-
Carefully pull the ribbon cable from its socket on the motherboard.
-
-
-
-
-
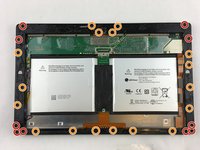
Remove ten 3.45 mm T3 screws from the corners of the black plastic bezel.
-
Remove the remaining seventeen 4.4 mm T5 screws from the perimeter of the bezel.
-
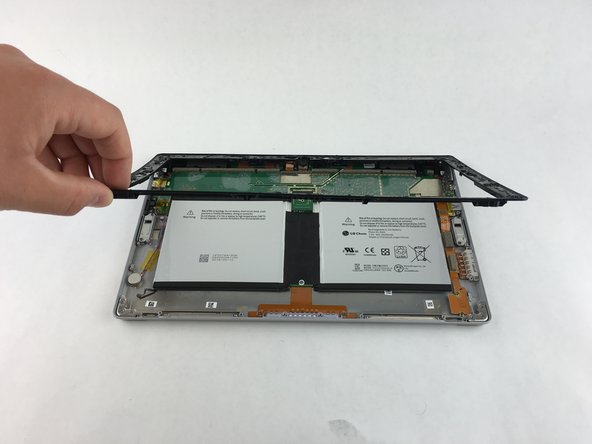
Once all screws have been removed, lift and remove the bezel from the rest of the device.
-
-
Tool used on this step:Tweezers$4.99
-
Gently peel off the yellow plastic tape using a pair of tweezers.
-
-
-
-
Use a spudger to lift up the retaining flap on the volume control cable ZIF connector.
-
-
-
Now that the volume control switch is loose, pull it gently away from the motherboard.
-
-




To reassemble your device, follow these instructions in reverse order.

Team

USF Tampa, Team 3-1, Wollert Spring 2016 Member of USF Tampa, Team 3-1, Wollert Spring 2016
USFT-WOLLERT-S16S3G1
4 Members
60 Guides authored
