Free Shipping on Domestic Orders $75+

Microsoft Bluetooth Ergonomic Mouse Side Buttons Replacement

What you need

  1. Microsoft Bluetooth Ergonomic Mouse Side Buttons Replacement, Shell: step 1, image 1 of 2 Microsoft Bluetooth Ergonomic Mouse Side Buttons Replacement, Shell: step 1, image 2 of 2
    • Remove the battery cover and take out both AAA batteries from the mouse.

    • At this point, the mouse should have no power source and be safe to work on.

    Ask FixBot

    Add Comment

  2. Microsoft Bluetooth Ergonomic Mouse Side Buttons Replacement: step 2, image 1 of 2 Microsoft Bluetooth Ergonomic Mouse Side Buttons Replacement: step 2, image 2 of 2
    • Insert a thin pry tool beneath the seam near the left and right click buttons.

    • Slide the pry tool toward the rear of the mouse while keeping the tool underneath the upper shell clips.

    • Gently release the retaining clips securing the top shell.

    • Continue working around the shell until the top cover separates from the lower housing.

    Ask FixBot

    Add Comment

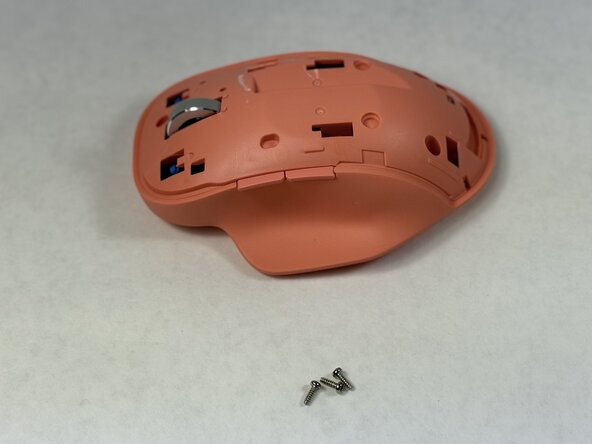
  3. Microsoft Bluetooth Ergonomic Mouse Side Buttons Replacement: step 3, image 1 of 2 Microsoft Bluetooth Ergonomic Mouse Side Buttons Replacement: step 3, image 2 of 2
    • Remove the three 7.1 mm T6 Torx screws securing the inner shell.

    Ask FixBot

    Add Comment

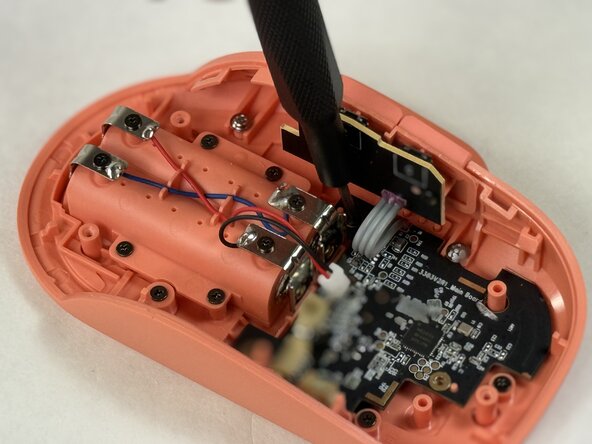
  4. Microsoft Bluetooth Ergonomic Mouse Side Buttons Replacement: step 4, image 1 of 2 Microsoft Bluetooth Ergonomic Mouse Side Buttons Replacement: step 4, image 2 of 2
    • Open the inner shell carefully from left to right to access the internal circuits.

    • Do not pull on the wires connecting the upper and lower shell components.

    Ask FixBot

    Add Comment

  5. Microsoft Bluetooth Ergonomic Mouse Side Buttons Replacement, Thumb/Side Buttons: step 5, image 1 of 3 Microsoft Bluetooth Ergonomic Mouse Side Buttons Replacement, Thumb/Side Buttons: step 5, image 2 of 3 Microsoft Bluetooth Ergonomic Mouse Side Buttons Replacement, Thumb/Side Buttons: step 5, image 3 of 3
    • Remove the three 4.1 mm Phillips #00 screws securing the motherboard.

    • The motherboard should now be loose while remaining connected by wires.

    Ask FixBot

    Add Comment

  6. Microsoft Bluetooth Ergonomic Mouse Side Buttons Replacement: step 6, image 1 of 2 Microsoft Bluetooth Ergonomic Mouse Side Buttons Replacement: step 6, image 2 of 2
    • Remove the two 7.1 mm Phillips screws securing the side button board.

    • The side button board remains connected to the main motherboard by soldered wires. Do not fully remove the board.

    Ask FixBot

    Add Comment

  7. Microsoft Bluetooth Ergonomic Mouse Side Buttons Replacement: step 7, image 1 of 2 Microsoft Bluetooth Ergonomic Mouse Side Buttons Replacement: step 7, image 2 of 2
    • Lift the main motherboard and side button board carefully to access the plastic side button components.

    • Avoid pulling or straining the wires connecting the boards.

    • The plastic side button components should now be accessible.

    Ask FixBot

    Add Comment

  8. Microsoft Bluetooth Ergonomic Mouse Side Buttons Replacement: step 8, image 1 of 3 Microsoft Bluetooth Ergonomic Mouse Side Buttons Replacement: step 8, image 2 of 3 Microsoft Bluetooth Ergonomic Mouse Side Buttons Replacement: step 8, image 3 of 3
    • Remove the plastic side button components from the mouse shell using tweezers.

    • Note the orientation of each component before removal.

    Ask FixBot

    Add Comment

Conclusion

To reassemble your device, follow these instructions in reverse order.

Cancel: I did not complete this guide.

Caden Lopes

Member since: 04/06/26

325 Reputation

3 Guides authored

Team

0 Guide Comments

Add Comment

View Statistics:

Past 24 Hours: 0

Past 7 Days: 2

Past 30 Days: 24

All Time: 73