
Mavic 2 Main Board Replacement

Robert Contraction and 3 other contributors
Last updated on Jul 31, 2024
Views: 2.4K
View statistics:
- Past 24 Hours:
- 6
- Past 7 Days:
- 29
- Past 30 Days:
- 114
- All Time:
- 2,437
Comments: 1
1 guide comment.
Go to guide commentsCompleted: 4 5
4 people have marked this guide "completed." Will you be next?
5 people have marked this guide "completed." Including you — great job!
Favorites: 0 1
No one has favorited (and subscribed to) this guide. Will you be the first?
1 person has favorited (and subscribed to) this guide — and that's you!
Introduction
Go to step 1 ↓- Turn drone upside down to expose underside plate.
- Begin to remove all 8 screws from the plate . Remember the 2 middle screws are bigger than the other 6 so set those aside separately.
- Pull plate off, exposing the main board.
- Detach 3 ribbons on the top of the board. Near the head of the drone. Use spreader.
- Remove screw holding circuit board in. 1 near the top, 2 near the bottom.
- Pop of all 4 antennas at the bottom of the circuit board. Use spreader.
- Pull away antennas and remove board carefully.
- Replace new circuit board.
- Attach 3 ribbons.
- Attach 4 antennas.
- Screw circuit board back in.
- Place the plate back on and screw back in all 8 screws.
What you need
Tools
-
-
-
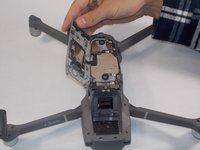
After all 8 Screws are removed. Remove the back panel. Keep in mind there is a ribbon connecting the panel and the main board. You must detach the ribbon from either side.
-
-
-
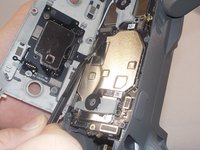
Unscrew the screws holding the board in place, as well as all the ribbons and antennas connecting the board to the frame.
-
-
-
-
Then remove the old board. Replace the new board you have and repeat the process in reverse.
-

 Ask FixBot




To reassemble your device, follow these instructions in reverse order.
Cancel: I did not complete this guide.
4 other people completed this guide.

