Free Shipping on Domestic Orders $75+

MacBook Pro 17" Unibody Feet Replacement

What you need

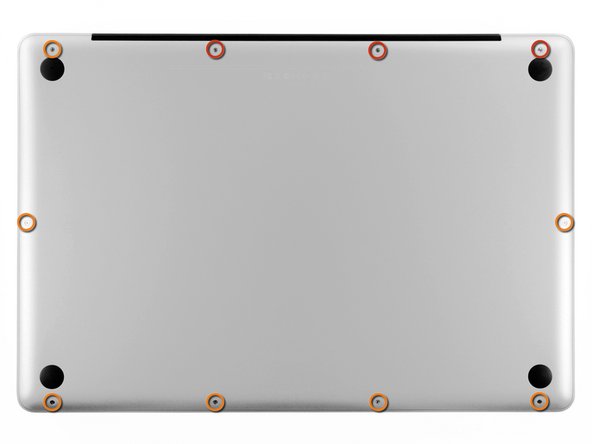
  1. MacBook Pro 17" Unibody Feet Replacement, Lower Case: step 1, image 1 of 1
    • Remove the following ten screws securing the lower case to the upper case:

    • Three 13.5 mm Phillips screws.

    • Seven 3 mm Phillips screws.

    Ask FixBot

    Add Comment

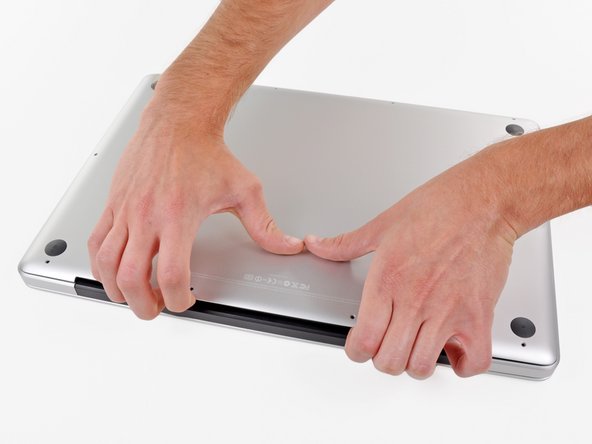
  2. MacBook Pro 17" Unibody Feet Replacement: step 2, image 1 of 2 MacBook Pro 17" Unibody Feet Replacement: step 2, image 2 of 2
    • Wedge your fingers between the lower case and the vent, and lift upward to release the two clips holding the lower case to the upper case.

    • During reassembly, carefully align the lower case and then press it firmly until both clips engage.

    • Remove the lower case.

    Ask FixBot

    Add Comment

  3. MacBook Pro 17" Unibody Feet Replacement, Feet: step 3, image 1 of 3 MacBook Pro 17" Unibody Feet Replacement, Feet: step 3, image 2 of 3 MacBook Pro 17" Unibody Feet Replacement, Feet: step 3, image 3 of 3
    Tool used on this step:
    Tweezers
    $4.99
    Buy
    • Remove any broken or damaged feet.

    • Remove any pieces from the old foot that may have broken off in the foot hole.

    • Use tweezers to peel up and remove the old adhesive tape from the foot pad.

    Ask FixBot

    Add Comment

  4. MacBook Pro 17" Unibody Feet Replacement: step 4, image 1 of 1
    • Scrub the foot pad with adhesive remover to remove any remaining adhesive.

    Ask FixBot

    Add Comment

  5. MacBook Pro 17" Unibody Feet Replacement: step 5, image 1 of 1
    • Wipe the foot pad with an alcohol prep pad to remove any residue left by the cleaner.

    Ask FixBot

    Add Comment

  6. MacBook Pro 17" Unibody Feet Replacement: step 6, image 1 of 1
    • Peel a replacement foot from the plastic backing.

    Ask FixBot

    Add Comment

  7. MacBook Pro 17" Unibody Feet Replacement: step 7, image 1 of 3 MacBook Pro 17" Unibody Feet Replacement: step 7, image 2 of 3 MacBook Pro 17" Unibody Feet Replacement: step 7, image 3 of 3
    • Align the new foot inside the foot pad.

    • Make sure the alignment nub on the foot is lined up with the small hole near the perimeter of the pad.

    • Lay the foot down while keeping it properly aligned.

    • Check for proper alignment from the inside of the lower case. Use tweezers to slide the alignment nub so it lines up with the hole.

    Ask FixBot

    Add Comment

  8. MacBook Pro 17" Unibody Feet Replacement: step 8, image 1 of 1
    • Press the new foot down firmly with your finger and maintain pressure for 30 seconds to set the pressure sensitive adhesive. Support the other side of the cover while you press the foot down.

    • Repeat the last six steps for any broken or damaged feet.

    Ask FixBot

    Add Comment

Conclusion

To reassemble the device, replace the lower case and all of the screws.

Cancel: I did not complete this guide.

10 other people completed this guide.

Arthur Shi

Member since: 01/03/18

338,159 Reputation

851 Guides authored

Team

iFixit Member of iFixit

Staff

122 Members

26,599 Guides authored

2 Guide Comments

I’m not sure if you really need to remove the lower case. It doesn’t really hurt it to do it though, give you a chance to blow out the accumulated dust.

snoakes1 - Reply Share

Great tip. Looks like I was doing it wrong. I’ll try that next time.

lovemymac - Reply Share

Add Comment

View Statistics:

Past 24 Hours: 3

Past 7 Days: 18

Past 30 Days: 84

All Time: 3,764