
Free Shipping on Domestic Orders $75+

MacBook Pro 15" Retina Display Mid 2012 Feet Replacement

What you need

  1. MacBook Pro 15" Retina Display Mid 2012 Feet Replacement, Lower Case: step 1, image 1 of 1
    • Remove the following P5 pentalobe screws securing the lower case to the MacBook Pro:

    • Eight 3.0 mm

    • Two 2.3 mm

    Ask FixBot

    Add Comment

  2. MacBook Pro 15" Retina Display Mid 2012 Feet Replacement: step 2, image 1 of 1
    • Lifting from the edge nearest the clutch cover, lift the lower case off the MacBook Pro.

    • Set the lower case aside.

    Ask FixBot

    Add Comment

  3. MacBook Pro 15" Retina Display Mid 2012 Feet Replacement, Feet: step 3, image 1 of 2 MacBook Pro 15" Retina Display Mid 2012 Feet Replacement, Feet: step 3, image 2 of 2
    • Peel away any stickers from the backside of the rear case covering the feet you have chosen to replace.

    • Any stickers you remove will most likely be unsalvageable for re-use. That's okay! Your MacBook does not need them to function.

    Ask FixBot

    Add Comment

  4. MacBook Pro 15" Retina Display Mid 2012 Feet Replacement: step 4, image 1 of 2 MacBook Pro 15" Retina Display Mid 2012 Feet Replacement: step 4, image 2 of 2
    Tool used on this step:
    Tweezers
    $4.99
    Buy
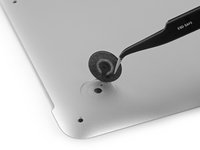
    • Remove any broken or damaged feet.

    • If the foot you are replacing is still intact, you can use your tweezers push it out from the inside.

    • If the old foot is difficult to remove, use a hair dryer or a heat gun to apply some heat to the area and loosen the adhesive.

    Ask FixBot

    Add Comment

  5. MacBook Pro 15" Retina Display Mid 2012 Feet Replacement: step 5, image 1 of 1
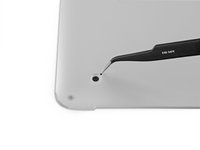
    • Scrub the foot cavity with adhesive remover to remove any remaining adhesive.

    Ask FixBot

    Add Comment

  6. MacBook Pro 15" Retina Display Mid 2012 Feet Replacement: step 6, image 1 of 1
    • Wipe the foot cavity with an isopropyl alcohol prep pad to remove any cleaner residue and prep the area for the adhesive on the new foot.

    Ask FixBot

    Add Comment

  7. MacBook Pro 15" Retina Display Mid 2012 Feet Replacement: step 7, image 1 of 1
    • Peel a replacement foot from the plastic backing.

    • The adhesive is fairly strong—make sure that you are peeling the foot up, not tearing the plastic backing.

    Ask FixBot

    Add Comment

  8. MacBook Pro 15" Retina Display Mid 2012 Feet Replacement: step 8, image 1 of 3 MacBook Pro 15" Retina Display Mid 2012 Feet Replacement: step 8, image 2 of 3 MacBook Pro 15" Retina Display Mid 2012 Feet Replacement: step 8, image 3 of 3
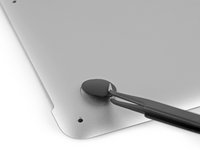
    • Align the new foot inside the cavity.

    • Make sure the alignment nub on the foot is lined up with the small hole near the perimeter of the pad.

    • You may want to use a pencil to lightly mark where the alignment nub is located. Be careful not to scratch the lower case with your pencil.

    • Lay the foot down while keeping it properly aligned.

    • Check for proper alignment from the inside of the case. The alignment nub should be slightly visible through the alignment hole.

    Ask FixBot

    Add Comment

  9. MacBook Pro 15" Retina Display Mid 2012 Feet Replacement: step 9, image 1 of 2 MacBook Pro 15" Retina Display Mid 2012 Feet Replacement: step 9, image 2 of 2
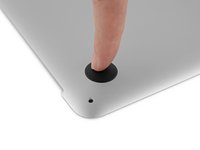
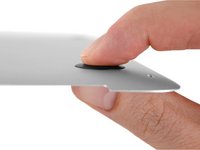
    • Press the new foot into place firmly with your finger, then apply pressure by pinching the foot from either side of the case with your finger and your thumb.

    • Maintain pressure for 30 seconds to set the pressure-sensitive adhesive.

    • Repeat the last seven steps for any remaining broken or worn feet.

    Ask FixBot

    Add Comment

Conclusion

To reassemble your device, follow these instructions in reverse order.

Cancel: I did not complete this guide.

19 other people completed this guide.

Taylor Dixon

Member since: 06/26/18

72,588 Reputation

94 Guides authored

0 Guide Comments

Add Comment

View Statistics:

Past 24 Hours: 0

Past 7 Days: 20

Past 30 Days: 87

All Time: 10,159