Introduction
Use this guide to upgrade or replace the solid-state drive in a MacBook Air 13” Early 2017. This MacBook Air uses a proprietary storage drive connector, and is therefore not compatible with common M.2 drives without the use of an adapter.
Before you perform this repair, if at all possible, back up your existing SSD. Then, either familiarize yourself with internet recovery or create a bootable external drive so you’ll be ready to install macOS onto your new drive and migrate your data to the new SSD.
Finally, we strongly recommend installing macOS 10.13 High Sierra (or a later macOS) before replacing the original SSD from your MacBook Air. Most new SSDs require updated storage drivers not found in versions of macOS prior to High Sierra.
What you need
-
-
Tool used on this step:P5 Pentalobe Screwdriver Retina MacBook Pro and Air$5.99
-
Use a P5 Pentalobe driver to remove ten screws securing the lower case, of the following lengths:
-
Two 9 mm screws
-
Eight 2.6 mm screws
 Ask FixBot
-
-
-
Wedge your fingers between the display and the lower case and pull upward to pop the lower case off the Air.
-
Remove the lower case and set it aside.
-
-
-
-
-
-
Grab the clear plastic pull tab attached to the battery connector and pull it parallel to the board toward the front edge of the Air.
-
-
-
-
-
Remove the single 2.9 mm T5 Torx screw securing the SSD to the logic board.
-
-
-
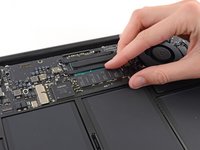
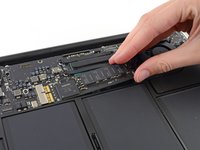
Gently lift the end of the SSD about half an inch and pull it straight out of its socket on the logic board.
-
-


To reassemble your device, follow these instructions in reverse order.
Take your e-waste to an R2 or e-Stewards certified recycler.
Repair didn’t go as planned? Try some basic troubleshooting, or ask our Answers community for help.
Cancel: I did not complete this guide.
51 other people completed this guide.

22 Guide Comments
Thanks! My wife’s MacBook Air is now rocking a 480GB drive (upgraded from 128GB).
Very easy to follow step…great job. Took less then 10 minutes. Upgraded Macbook Air (2017) from original 120GB to 480GB SSD. I used TimeMachine backup to perform the restore, which went flawless and was completed in under 3 hours.
Key is to press Option + Command + R to bring up “Internet Recovery”. If you press Command + R, the new drive will not be recognized and won’t be shown.
The introduction states, “This MacBook Air uses a proprietary storage drive connector, and is therefore not compatible with common M.2 drives without the use of an adapter.” However, both the parts list and step 5 (the last step shown on my screen…am I missing later steps?) do not mention this adapter. Is the adapter truly needed?
Yes, if you search the major online retailer that is also a river in South America, you will find adapters for standard m.2 drives (samsung, crucial, etc.) If you do not want to use an adapter, you can purchase a drop in replacement from OWC, however they are more expensive.
When I use an M.2 drive with adapter, I can use any ssd? or they need to be compatible in a logic way? (not hardware but software compatible)
