Free Shipping on Domestic Orders $75+

MacBook Air 11" Late 2010 Fan Replacement

What you need

  1. MacBook Air 11" Late 2010 Fan Replacement, Lower Case: step 1, image 1 of 1
    Tool used on this step:
    P5 Pentalobe Screwdriver Retina MacBook Pro and Air
    $5.99
    Buy
    • Before proceeding, close your computer and lay it on a soft surface top-side down.

    • Remove the following ten screws:

    • Two 8 mm 5-point Pentalobe screws

    • Eight 2.5 mm 5-point Pentalobe screws

    • The special screwdriver needed to remove the eight 5-point Pentalobe screws can be found here.

    Ask FixBot

    Add Comment

  2. MacBook Air 11" Late 2010 Fan Replacement: step 2, image 1 of 1
    • Wedge your fingers between the display and the lower case and pull upward to pop the lower case off the Air.

    • Remove the lower case and set it aside.

    Ask FixBot

    Add Comment

  3. MacBook Air 11" Late 2010 Fan Replacement, Battery: step 3, image 1 of 2 MacBook Air 11" Late 2010 Fan Replacement, Battery: step 3, image 2 of 2
    • In this step you will disconnect the battery to help avoid shorting out any components during service.

    • Use the flat end of a spudger to pry both short sides of the battery connector upward to disconnect it from its socket on the logic board.

    • Bend the battery cable slightly away from the logic board so the connector will not accidentally contact its socket.

    Ask FixBot

    Add Comment

  4. MacBook Air 11" Late 2010 Fan Replacement, Solid-State Drive: step 4, image 1 of 1
    • Remove the single 2.9 mm T5 Torx screw securing the SSD to the logic board.

    Ask FixBot

    Add Comment

  5. MacBook Air 11" Late 2010 Fan Replacement: step 5, image 1 of 2 MacBook Air 11" Late 2010 Fan Replacement: step 5, image 2 of 2
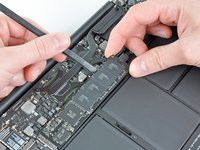
    • Use a spudger to help lift the free end of the SSD just enough to grab it with your other hand.

    • Do not lift the end of the SSD excessively.

    • Pull the drive straight out of its socket and remove it from the logic board.

    • When reinstalling the SSD, be sure it is properly seated before reinstalling its retaining screw.

    Ask FixBot

    Add Comment

  6. MacBook Air 11" Late 2010 Fan Replacement, I/O Board Cable: step 6, image 1 of 1
    • Use the flat end of a spudger to pry the I/O board cable connector upward out of its socket on the I/O board.

    Ask FixBot

    Add Comment

  7. MacBook Air 11" Late 2010 Fan Replacement: step 7, image 1 of 1
    • The following connector has an especially deep socket. Use care when disconnecting it.

    • While gently pulling the I/O board cable upward near its connection to the logic board, use the tip of a spudger to pry upward on alternating sides of the connector to help "walk" it out of its socket.

    • Remove the I/O board cable.

    Ask FixBot

    Add Comment

  8. MacBook Air 11" Late 2010 Fan Replacement, Fan: step 8, image 1 of 1
    • Use the tip of a spudger to carefully flip up the retaining flap on the fan cable ZIF socket.

    • Be sure you are prying up on the hinged retaining flap, not the socket itself.

    Ask FixBot

    Add Comment

  9. MacBook Air 11" Late 2010 Fan Replacement: step 9, image 1 of 1
    • Remove the following three screws securing the fan to the upper case:

    • Two 5.2 mm T5 Torx screws

    • One 3.6 mm T5 Torx screw

    Ask FixBot

    Add Comment

  10. MacBook Air 11" Late 2010 Fan Replacement: step 10, image 1 of 1
    • Lift the fan out of the upper case and carefully pull the fan ribbon cable out of its socket as you remove it from the Air.

    Ask FixBot

    Add Comment

Conclusion

To reassemble your device, follow these instructions in reverse order.

Cancel: I did not complete this guide.

10 other people completed this guide.

1 Guide Comment

thanks a million—clear and accessible.And we did it!

gigi marks - Reply Share

Add Comment

View Statistics:

Past 24 Hours: 0

Past 7 Days: 13

Past 30 Days: 78

All Time: 13,544