
Free Shipping on Domestic Orders $75+

Mac mini Late 2012 Antenna Plate Replacement

What you need

  1. Mac mini Late 2012 Antenna Plate Replacement, Bottom Cover: step 1, image 1 of 2 Mac mini Late 2012 Antenna Plate Replacement, Bottom Cover: step 1, image 2 of 2
    • Place your thumbs in the depressions cut into the bottom cover.

    • Rotate the bottom cover counter-clockwise until the white dot painted on the bottom cover is aligned with the ring inscribed on the outer case.

    • You do not need to apply much downward pressure while turning.

    Ask FixBot

    Add Comment

  2. Mac mini Late 2012 Antenna Plate Replacement: step 2, image 1 of 1
    • Tilt the mini enough to allow the bottom cover to fall away from the outer case.

    • Remove the bottom cover and set it aside.

    Ask FixBot

    Add Comment

  3. Mac mini Late 2012 Antenna Plate Replacement, Fan: step 3, image 1 of 1
    • Remove the two 11.3 mm T6 Torx screws securing the fan to the logic board near the antenna plate.

    Ask FixBot

    Add Comment

  4. Mac mini Late 2012 Antenna Plate Replacement: step 4, image 1 of 1
    • Lift the ear of the fan nearest the RAM up off the standoff secured to the outer case.

    • Removing the standoff screw is not necessary to remove the fan. You need only raise the fan enough to lift it off the standoff screw.

    Ask FixBot

    Add Comment

  5. Mac mini Late 2012 Antenna Plate Replacement: step 5, image 1 of 3 Mac mini Late 2012 Antenna Plate Replacement: step 5, image 2 of 3 Mac mini Late 2012 Antenna Plate Replacement: step 5, image 3 of 3
    • Lift the fan out of the mini for enough clearance to access its connector.

    • Grab all the wires at once and gently pull straight up to disconnect the fan from the logic board.

    • Do not pry at the socket, or you may rip it from the logic board.

    • Remove the fan.

    Ask FixBot

    Add Comment

  6. Mac mini Late 2012 Antenna Plate Replacement, Cowling: step 6, image 1 of 1
    • Remove the single 3.5 mm T6 Torx screw securing the cowling to the heat sink.

    Ask FixBot

    Add Comment

  7. Mac mini Late 2012 Antenna Plate Replacement: step 7, image 1 of 1
    • Lift the cowling from the end nearest the antenna plate.

    • Rotate the cowling away from the outer case and remove it from the mini.

    Ask FixBot

    Add Comment

  8. Mac mini Late 2012 Antenna Plate Replacement, Antenna Plate: step 8, image 1 of 1
    • Remove the following screws securing the antenna plate to the mini:

    • Two 6.6 mm T8 Torx screws

    • Two 5.0 mm T8 Torx or 2.0 mm Hex screws (either screwdriver will work)

    • When putting back together:

    • It can be difficult to get the hard drive seated correctly such that the antenna plate fits in place correctly. If the screw holes don't line up with those on the hard drive, make sure that the two pins that are in the back of the hard drive are properly seated in the holes at the back of the case, above the housing for the second hard drive.

    • The antenna attaches directly to the hard drive (red markers), therefore attaching the antenna can move the hard drive around and loosen the connection of the hard drive cable to the logic board.

    Ask FixBot

    Add Comment

  9. Mac mini Late 2012 Antenna Plate Replacement: step 9, image 1 of 2 Mac mini Late 2012 Antenna Plate Replacement: step 9, image 2 of 2
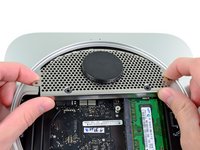
    • Slightly lift the antenna plate from the end closest to the RAM.

    • Carefully pull the antenna plate away from the circular rim of the outer case.

    • Do not remove the antenna plate yet. It is still attached to the AirPort/ Bluetooth board.

    Ask FixBot

    Add Comment

  10. Mac mini Late 2012 Antenna Plate Replacement: step 10, image 1 of 1
    • Use the tip of a spudger to carefully pry the antenna connector up from its socket on the AirPort/Bluetooth board.

    Ask FixBot

    Add Comment

  11. Mac mini Late 2012 Antenna Plate Replacement: step 11, image 1 of 1
    • Remove the antenna plate from the mini.

    Ask FixBot

    Add Comment

Conclusion

To reassemble your device, follow these instructions in reverse order.

Cancel: I did not complete this guide.

12 other people completed this guide.

Andrew Optimus Goldheart

Member since: 10/17/09

515,184 Reputation

407 Guides authored

Team

iFixit Member of iFixit

Staff

122 Members

26,590 Guides authored

0 Guide Comments

Add Comment

View Statistics:

Past 24 Hours: 3

Past 7 Days: 31

Past 30 Days: 112

All Time: 11,713