Free Shipping on Domestic Orders $75+

This translation was generated by a machine and has not been reviewed by a person yet. Speak this language? Review it.

Mac Studio (2022) Power Supply Replacement

Views: 490

View statistics:

Past 24 Hours:
5
Past 7 Days:
38
Past 30 Days:
197
All Time:
490
Comments: 0

No one has left comments on this guide. Will you be first?

Go to guide comments
Completed: 1

1 person has marked this guide "completed." Will you be next?

Favorites: 1

1 person has favorited (and subscribed to) this guide. Will you be next?

Time Required: 1 hour
Difficulty: Moderate
Bullets!

Better coordination with markups and the color/type of bullets will help make this guide more clear!

Community-Contributed Guide

An awesome member of our community made this guide. It was not created by iFixit staff.

Better Introduction

Improve this guide by completing or revising its introduction.

Missing Details

Some of this guide's details are missing. Help users by adding tools, difficulty, or time.

Mac Studio (2022) Power Supply Replacement
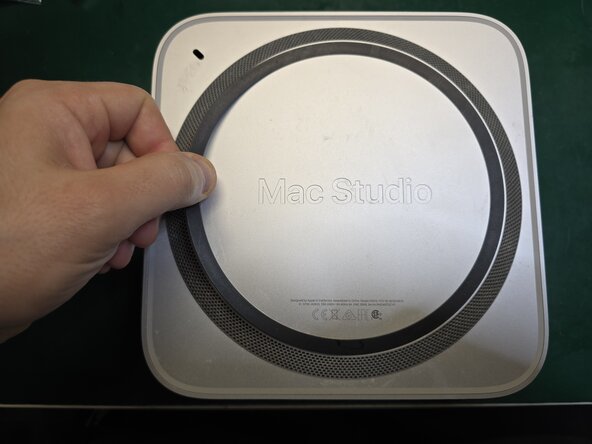
    1. Mac Studio (2022) Power Supply Replacement, Power Supply: step 1, image 1 of 3 Mac Studio (2022) Power Supply Replacement, Power Supply: step 1, image 2 of 3 Mac Studio (2022) Power Supply Replacement, Power Supply: step 1, image 3 of 3
      • Dampen the black circular rubber with a little isopropyl alcohol and insert a feeler gauge underneath it.

      Ask FixBot

      Add Comment

    2. Mac Studio (2022) Power Supply Replacement: step 2, image 1 of 3 Mac Studio (2022) Power Supply Replacement: step 2, image 2 of 3 Mac Studio (2022) Power Supply Replacement: step 2, image 3 of 3
      • Work underneath the entire rubber strip, adding a bit of isopropyl alcohol as you go.

      Ask FixBot

      Add Comment

    3. Mac Studio (2022) Power Supply Replacement: step 3, image 1 of 3 Mac Studio (2022) Power Supply Replacement: step 3, image 2 of 3 Mac Studio (2022) Power Supply Replacement: step 3, image 3 of 3
      • Remove the rubber

      Ask FixBot

      Add Comment

    4. Mac Studio (2022) Power Supply Replacement: step 4, image 1 of 3 Mac Studio (2022) Power Supply Replacement: step 4, image 2 of 3 Mac Studio (2022) Power Supply Replacement: step 4, image 3 of 3
      • Use a T8 screwdriver to remove the 4 cover screws.

      Ask FixBot

      Add Comment

    5. Mac Studio (2022) Power Supply Replacement: step 5, image 1 of 3 Mac Studio (2022) Power Supply Replacement: step 5, image 2 of 3 Mac Studio (2022) Power Supply Replacement: step 5, image 3 of 3
      • Remove the 4 T10 screws

      Ask FixBot

      Add Comment

    6. Mac Studio (2022) Power Supply Replacement: step 6, image 1 of 3 Mac Studio (2022) Power Supply Replacement: step 6, image 2 of 3 Mac Studio (2022) Power Supply Replacement: step 6, image 3 of 3
      • Remove the safety cover of the 2 screws with tweezers

      Ask FixBot

      Add Comment

    7. Mac Studio (2022) Power Supply Replacement: step 7, image 1 of 3 Mac Studio (2022) Power Supply Replacement: step 7, image 2 of 3 Mac Studio (2022) Power Supply Replacement: step 7, image 3 of 3
      • Still using the T10 screwdriver, remove the two 12V screws from the power supply and gently lift it up.

      Ask FixBot

      Add Comment

    8. Mac Studio (2022) Power Supply Replacement: step 8, image 1 of 2 Mac Studio (2022) Power Supply Replacement: step 8, image 2 of 2
      • Remove the power supply by disconnecting the connector shown in the photo on the back.

      • Follow the guide in reverse order to reassemble the new power supply.

      Ask FixBot

      Add Comment

Conclusion

To reassemble your device, follow these instructions in reverse order.

Cancel: I did not complete this guide.

One other person completed this guide.

andreacero

Member since: 01/18/11

695 Reputation

4 Guides authored

0 Guide Comments

Add Comment

View Statistics:

Past 24 Hours: 5

Past 7 Days: 38

Past 30 Days: 197

All Time: 490