
Mac Powerbook 140 Hard Drive Replacement

Last updated on Aug 2, 2024
Views: 2.1K
View statistics:
- Past 24 Hours:
- 2
- Past 7 Days:
- 15
- Past 30 Days:
- 102
- All Time:
- 2,058
Comments: 0
No one has left comments on this guide. Will you be first?
Go to guide commentsCompleted: 1 2
1 person has marked this guide "completed." Will you be next?
2 people have marked this guide "completed." Including you — great job!
Favorites: 0 1
No one has favorited (and subscribed to) this guide. Will you be the first?
1 person has favorited (and subscribed to) this guide — and that's you!
Needs More Images
A few more images would make this guide's procedures crystal clear.
Community-Contributed Guide
An awesome member of our community made this guide. It was not created by iFixit staff.
Introduction
Go to step 1 ↓Follow this guide to replace the hard drive in your Macintosh Powerbook 140 computer. Always ensure all of your parts are compatible and will not damage your computer or pose any health or safety hazards. Always make sure you keep track of all parts. Wash hands thoroughly after handling components. Most of all, USE COMMON SENSE.
Note- I am no computer expert. Please notify me of any errors or necessary changes. Thanks!
What you need
-
-
-
Turn the 140 upside down and remove the 4 screws in the bottom with a T10 star-headed screwdriver
 Ask FixBot
-
-
-
Being careful to hold the top and bottom halves of the computer together, turn to the back side of the computer and remove the final screw with a T17 Star-headed screwdriver.
-
-
-
Slide the battery panel or switch(depending on your battery) toward the front of the computer, then pull the battery straight out.
-
-
-
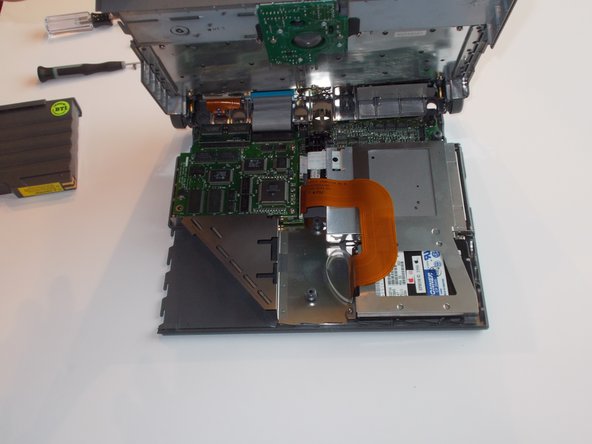
CAREFULLY lift the back of the screen and keyboard unit(the top of the computer) and GENTLY push the front left and right corners away from the bottom unit until a click is heard. Then, SLOWLY lift the top unit and remove the interconnect cable (the large somewhat brittle cable connecting the two halves) from its socket in the sisterboard.
-
-
-
Using the T-17 Star headed screwdriver, take out the screws holding in drive retainer that covers the hard drive and floppy disc drive. Some of these screws may be inserted very tightly. If any stick, CAREFULLY use a pair of needle-nosed pliers to twist the screw out.
-
-
-
-
Now, remove the long, flat HDA cable from the hard drive by pulling the white plastic piece directly out of the bottom of the hard drive. Be sure to do this CAREFULLY, as the flat cable can easily become disconnected from the plastic piece. Should this happen, pull the top and bottom of the piece away from each other and GENTLY re-insert the cable.
-
-
-
Locate your new and COMPATIBLE hard drive. Ensure that is is in proper working order and will not damage your computer or pose any health or safety risk to you.
-
-


To reassemble your device, follow these instructions in reverse order. Once complete, start up your computer to ensure the hard drive works. Should you have any issues, ensure all connections were made correctly and that all parts were properly replaces. For further questions, refer to this guide or to the iFixit Answers Forum.
Cancel: I did not complete this guide.
One other person completed this guide.

