Free Shipping on Domestic Orders $75+

MSI GS65 Stealth Thin 8RE RAM Replacement

What you need

    1. MSI GS65 Stealth Thin 8RE RAM Replacement, RAM: step 1, image 1 of 2 MSI GS65 Stealth Thin 8RE RAM Replacement, RAM: step 1, image 2 of 2
      • Remove the fifteen black 6.0 mm Phillips #00 screws from the back cover.

      • Carefully remove the back cover.

      • It may be easier to remove the back cover by starting at the ethernet port and running something thin along the sides until the panel pops off.

      • When reassembling the back cover, it should "click" into place.

      Ask FixBot

      Add Comment

    2. MSI GS65 Stealth Thin 8RE RAM Replacement: step 2, image 1 of 3 MSI GS65 Stealth Thin 8RE RAM Replacement: step 2, image 2 of 3 MSI GS65 Stealth Thin 8RE RAM Replacement: step 2, image 3 of 3
      • Remove the three silver 4.0 mm Phillips #00 battery screws.

      • Separate the red wire running on top of the battery from the battery.

      • Lift the battery out slightly, then carefully wiggle and pull the battery connector cable out.

      • Be sure not to pull excessively on the battery when it is still connected to the motherboard.

      Ask FixBot

      Add Comment

    3. MSI GS65 Stealth Thin 8RE RAM Replacement: step 3, image 1 of 3 MSI GS65 Stealth Thin 8RE RAM Replacement: step 3, image 2 of 3 MSI GS65 Stealth Thin 8RE RAM Replacement: step 3, image 3 of 3
      • Gently unclasp and unplug the four connectors by first lifting the black locking bars of the ZIF connectors.

      • The black locking tables can be lifted by using something small such as a fingernail.

      • There may be black tape covering the ribbon cables that need to be removed.

      • Be gentle while dealing with ribbon connectors since if damaged will cause malfunction.

      • When reassembling, make sure that each ribbon connector is completely inserted before lowering the black tab.

      Ask FixBot

      Add Comment

    4. MSI GS65 Stealth Thin 8RE RAM Replacement: step 4, image 1 of 3 MSI GS65 Stealth Thin 8RE RAM Replacement: step 4, image 2 of 3 MSI GS65 Stealth Thin 8RE RAM Replacement: step 4, image 3 of 3
      • Unscrew the single 4 mm Phillips #00 screw securing the Wi-Fi card.

      • Remove the Wi-Fi card and the cable located next to it.

      • Be careful to not unplug the two wires next to the screw.

      • There will be a yellow tape covering the WiFi card that will need to be removed.

      • Make sure to keep the yellow tape to reapply on the Wi-Fi card when reassembling.

      Ask FixBot

      Add Comment

    5. MSI GS65 Stealth Thin 8RE RAM Replacement: step 5, image 1 of 3 MSI GS65 Stealth Thin 8RE RAM Replacement: step 5, image 2 of 3 MSI GS65 Stealth Thin 8RE RAM Replacement: step 5, image 3 of 3
      • Remove the last two ZIF ribbon connectors.

      • Slowly unpeel the black ribbon connector from the fan.

      • When reassembling, make sure to adhere the black ribbon to the motherboard in a way that does not cover the fan.

      Ask FixBot

      Add Comment

    6. MSI GS65 Stealth Thin 8RE RAM Replacement: step 6, image 1 of 3 MSI GS65 Stealth Thin 8RE RAM Replacement: step 6, image 2 of 3 MSI GS65 Stealth Thin 8RE RAM Replacement: step 6, image 3 of 3
      • Unscrew the two black 6 mm Phillips #00 screws below each fan.

      • Slightly lift the motherboard.

      • While the motherboard is lifted, thread the Wi-Fi card through the hole as shown.

      • There may be a piece of yellow tape holding the WiFi card wires down that needs to be removed.

      Ask FixBot

      Add Comment

    7. MSI GS65 Stealth Thin 8RE RAM Replacement: step 7, image 1 of 2 MSI GS65 Stealth Thin 8RE RAM Replacement: step 7, image 2 of 2
      • Double-check that everything connected to the motherboard as shown in the previous steps has been removed.

      • Carefully remove the motherboard and flip it over.

      Ask FixBot

      Add Comment

    8. MSI GS65 Stealth Thin 8RE RAM Replacement: step 8, image 1 of 3 MSI GS65 Stealth Thin 8RE RAM Replacement: step 8, image 2 of 3 MSI GS65 Stealth Thin 8RE RAM Replacement: step 8, image 3 of 3
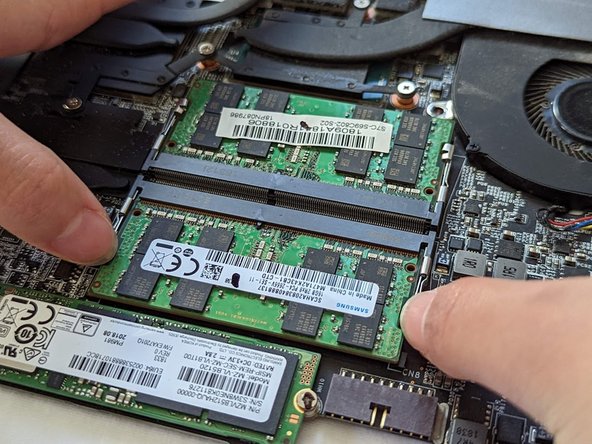
      • Locate the RAM.

      • Carefully pull apart the silver arms holding the RAM down, and the RAM should pop up.

      • Pull the RAM out.

      • When inserting the new RAM, it will snap into place.

      Ask FixBot

      Add Comment

Conclusion

To reassemble your device, follow these instructions in reverse order.

Cancel: I did not complete this guide.

4 other people completed this guide.

Annie Lin

Member since: 08/22/22

265 Reputation

1 Guide authored

Team

0 Guide Comments

Add Comment

View Statistics:

Past 24 Hours: 3

Past 7 Days: 23

Past 30 Days: 142

All Time: 3,191