Introduction
This guide will help you replace the battery in your MSI GS63VR 6RF Stealth Pro. You will need to have purchased the replacement battery prior if you are replacing your battery.
What you need
-
-
Use a Phillips screwdriver to remove the 15 screws securing the back cover.
-
Insert an opening tool or spudger in the seam and pry along the perimeter to loosen the back cover.
-
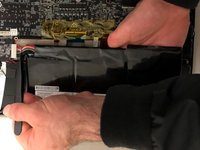
Remove the back cover.
 Ask FixBot
-
-
-
-
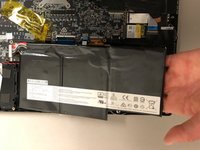
Disconnect the battery by carefully pulling its connector towards the battery.
-


To reassemble your device, follow these instructions in reverse order.
For optimal performance, after completing this guide, calibrate your newly installed battery.
Take your e-waste to an R2 or e-Stewards certified recycler.
Repair didn’t go as planned? Try some basic troubleshooting, or ask our Answers community for help.
Cancel: I did not complete this guide.
4 other people completed this guide.
Team

University of North Texas, Team S5-G5, Thomas Fall 2017 Member of University of North Texas, Team S5-G5, Thomas Fall 2017
UNT-THOMAS-F17S5G5
4 Members
4 Guides authored