
Logitech z-5500 LCD Screen Replacement

Nicolas Cambas and 2 other contributors
Last updated on Mar 18, 2024
Views: 9K
View statistics:
- Past 24 Hours:
- 5
- Past 7 Days:
- 49
- Past 30 Days:
- 228
- All Time:
- 8,970
Comments: 9
4 comments on steps, 5 guide comments.
Go to guide commentsCompleted: 8 9
8 people have marked this guide "completed." Will you be next?
9 people have marked this guide "completed." Including you — great job!
Favorites: 1 2
1 person has favorited (and subscribed to) this guide. Will you be next?
2 people have favorited (and subscribed to) this guide — including you!
Featured Guide
This guide has been found to be exceptionally cool by the iFixit staff.
Community-Contributed Guide
An awesome member of our community made this guide. It was not created by iFixit staff.
Introduction
Go to step 1 ↓This rather exceptional speaker kit has very few problems, but sometimes the control screen no longer has a backlight or does not work very well.
The goal here is to replace it. Apart from the soldering part, it is a relatively simple operation.
I added references to compatible screens in the part description; I was able to buy mine on aliexpress.com.
What you need
Parts
-
Ecran de remplacement compatible (VC-B200252)
Ref. officielle : VC-B200251 et VC-B200252. VC-B200251 et VC-B200252 sont compatibles.
Tools


-
-
-
Remove the stand by unscrewing the two screws with a #3 Hexagon driver.
-
Remove the 4 screws, one from each corner of the case, with a Phillips #2 screwdriver.
 Ask FixBot
-
-
-
Remove the volume button on the front of the pod. It may be a little difficult to pull off because it is lightly glued.
-
Separate the two sides by removing the two pieces (black and gray). They are clipped in 3 different places.
-
-
-
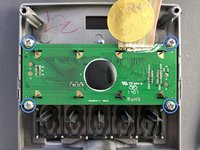
Remove the 4 screws with a Phillips #2 screwdriver.
-
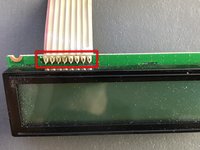
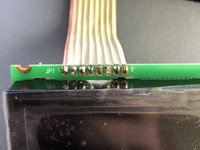
It will be necessary to desolder all the wires in the ribbon cable more or less at the same time. You can also simply cut the end of the ribbon cable and strip the individual wires.
-
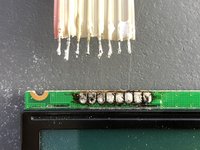
Clean the wires so that they are not too thick. (we can do much better than in the photo!)
-
-
-
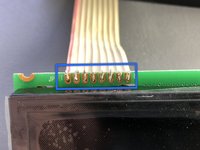
Position the wires in the holes, and bend them upwards to make soldering a little easier.
-
-
-
-
Reassemble the case, plug it in, and enjoy a brand new display! Here we go again for 10 years!
-
-





To reassemble your device, follow the instructions in reverse order.
Cancel: I did not complete this guide.
8 other people completed this guide.
Special thanks to these translators:
100%


These translators are helping us fix the world! Want to contribute?
Start translating ›

5 Guide Comments
Tuto très bien fait !
Très facile à réaliser en sachant qu’il n’y a pas de mauvaise surprise de fixations ou câbles collés. Merci !!!
Ceci étant, on ne trouve l’écran plus qu’ici :
Un très bon tuto, bonne réalisation
Good réparation effectuéeà l'instant
Super le tuto, merci beaucoup.
Je viens d'effectuer la réparation facilement, tout est fonctionnel.
La seule chose, c'est la disponibilité de l'écran... difficile d'en trouver, j'ai pris celui sur AliExpress à environ 30€.
Where can buy this LCD now?
