
Free Shipping on Domestic Orders $75+

Logitech UE Megablast Motherboard Replacement

What you need

  1. Logitech UE Megablast Motherboard Replacement, Battery: step 1, image 1 of 3 Logitech UE Megablast Motherboard Replacement, Battery: step 1, image 2 of 3 Logitech UE Megablast Motherboard Replacement, Battery: step 1, image 3 of 3
    • Turn the silver D-ring on one end of the speaker counterclockwise with your fingers to remove it.

    Ask FixBot

    Add Comment

  2. Logitech UE Megablast Motherboard Replacement: step 2, image 1 of 3 Logitech UE Megablast Motherboard Replacement: step 2, image 2 of 3 Logitech UE Megablast Motherboard Replacement: step 2, image 3 of 3
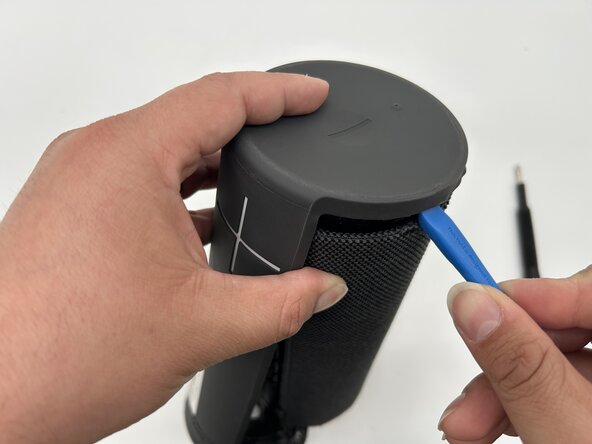
    • Insert the blue iFixit opening tool between the rubber end and the mesh.

    • Pry the rubber end to remove it.

    Ask FixBot

    Add Comment

  3. Logitech UE Megablast Motherboard Replacement: step 3, image 1 of 3 Logitech UE Megablast Motherboard Replacement: step 3, image 2 of 3 Logitech UE Megablast Motherboard Replacement: step 3, image 3 of 3
    • Use a Phillips #2 screwdriver to remove the four 12 mm screws.

    Ask FixBot

    Add Comment

  4. Logitech UE Megablast Motherboard Replacement: step 4, image 1 of 3 Logitech UE Megablast Motherboard Replacement: step 4, image 2 of 3 Logitech UE Megablast Motherboard Replacement: step 4, image 3 of 3
    • Use the iFixit opening tool to gently pry the black plastic cover out of the end of the speaker.

    Ask FixBot

    Add Comment

  5. Logitech UE Megablast Motherboard Replacement: step 5, image 1 of 3 Logitech UE Megablast Motherboard Replacement: step 5, image 2 of 3 Logitech UE Megablast Motherboard Replacement: step 5, image 3 of 3
    • Gently pull the 3400 mAh rechargeable lithium-ion battery straight out of the speaker.

    Ask FixBot

    Add Comment

  6. Logitech UE Megablast Motherboard Replacement, Speaker: step 6, image 1 of 3 Logitech UE Megablast Motherboard Replacement, Speaker: step 6, image 2 of 3 Logitech UE Megablast Motherboard Replacement, Speaker: step 6, image 3 of 3
    • Use an iFixit opening tool to gently lift a corner of the rubber spine.

    • Start from a side that is easier to grip (usually the bottom or the side).

    • Slowly pull the rubber upward around each button, checking for any adhesive spots or clips and detaching them carefully.

    Ask FixBot

    Add Comment

  7. Logitech UE Megablast Motherboard Replacement: step 7, image 1 of 3 Logitech UE Megablast Motherboard Replacement: step 7, image 2 of 3 Logitech UE Megablast Motherboard Replacement: step 7, image 3 of 3
    • Use an iFixit opening tool to gently pry up the lip at the top of the spine, starting at the 9 o’clock position, to release the latch.

    • Continue to pry around the edge of the lid towards the 6 and 3 o’clock positions until it is completely removed.

    • Carefully remove the spine with the top and bottom ends attached to avoid tearing it.

    Ask FixBot

    Add Comment

  8. Logitech UE Megablast Motherboard Replacement: step 8, image 1 of 1
    • Use a pair of tweezers to pull down the flaps near the top back of the speaker.

    Ask FixBot

    Add Comment

  9. Logitech UE Megablast Motherboard Replacement: step 9, image 1 of 2 Logitech UE Megablast Motherboard Replacement: step 9, image 2 of 2
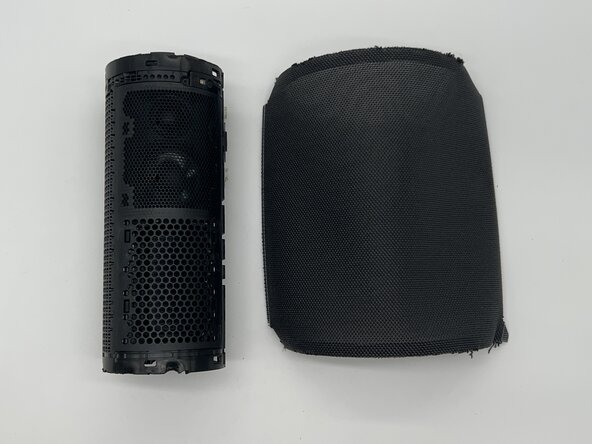
    • Gently use a pair of tweezers to lift a corner of the fabric mesh from the frame.

    • Slide an opening pick along the edges to slowly free the mesh, being careful not to tear it.

    Ask FixBot

    Add Comment

  10. Logitech UE Megablast Motherboard Replacement: step 10, image 1 of 2 Logitech UE Megablast Motherboard Replacement: step 10, image 2 of 2
    • Gently slide an opening pick or tweezers under the top edge of the fabric mesh to detach it from the top and bottom of the speaker.

    Ask FixBot

    Add Comment

  11. Logitech UE Megablast Motherboard Replacement: step 11, image 1 of 2 Logitech UE Megablast Motherboard Replacement: step 11, image 2 of 2
    • Carefully remove the mesh and set it aside for reassembly.

    Ask FixBot

    Add Comment

  12. Logitech UE Megablast Motherboard Replacement: step 12, image 1 of 3 Logitech UE Megablast Motherboard Replacement: step 12, image 2 of 3 Logitech UE Megablast Motherboard Replacement: step 12, image 3 of 3
    • Use the iFixit opening tool to release the clips along the seam, starting at a corner or the side

    • Gently lift the plastic cover away from the body to expose the speaker underneath.

    Ask FixBot

    Add Comment

  13. Logitech UE Megablast Motherboard Replacement: step 13, image 1 of 3 Logitech UE Megablast Motherboard Replacement: step 13, image 2 of 3 Logitech UE Megablast Motherboard Replacement: step 13, image 3 of 3
    • Use the Phillips #2 screwdriver to remove the Bluetooth button board from the Megablast.

    • Lift the Bluetooth button PCB and slide a thin, ESD-safe pry tool or angled tweezers under the metal neck of the connector (as close to the head as possible) and lift straight up from the board.

    • Remove the PCB and set it aside.

    Ask FixBot

    Add Comment

  14. Logitech UE Megablast Motherboard Replacement: step 14, image 1 of 2 Logitech UE Megablast Motherboard Replacement: step 14, image 2 of 2
    • Using a screwdriver, gently push out the hooked portions of the metal rods from the Megablast.

    Ask FixBot

    Add Comment

  15. Logitech UE Megablast Motherboard Replacement: step 15, image 1 of 3 Logitech UE Megablast Motherboard Replacement: step 15, image 2 of 3 Logitech UE Megablast Motherboard Replacement: step 15, image 3 of 3
    • Use a pair of tweezers to grip the end and gently pull each rod straight out, avoiding any bending or twisting.

    • Set the rods aside.

    Ask FixBot

    Add Comment

  16. Logitech UE Megablast Motherboard Replacement: step 16, image 1 of 3 Logitech UE Megablast Motherboard Replacement: step 16, image 2 of 3 Logitech UE Megablast Motherboard Replacement: step 16, image 3 of 3
    • Use the iFixit opening tool to release the clips holding the speaker in place.

    Ask FixBot

    Add Comment

  17. Logitech UE Megablast Motherboard Replacement: step 17, image 1 of 3 Logitech UE Megablast Motherboard Replacement: step 17, image 2 of 3 Logitech UE Megablast Motherboard Replacement: step 17, image 3 of 3
    • Before you remove the speaker, pull the white speaker connector from the motherboard.

    • Remove the speakers from the device.

    Ask FixBot

    Add Comment

  18. Logitech UE Megablast Motherboard Replacement, Motherboard: step 18, image 1 of 2 Logitech UE Megablast Motherboard Replacement, Motherboard: step 18, image 2 of 2
    • Slide a thin, ESD-safe pry tool or angled tweezers under the metal neck of the connector, as close to the head as possible. Lift straight up to disconnect it from the small board on the side wall of the frame.

    Ask FixBot

    Add Comment

  19. Logitech UE Megablast Motherboard Replacement: step 19, image 1 of 2 Logitech UE Megablast Motherboard Replacement: step 19, image 2 of 2
    • Disconnect the white coaxial cable connector on the opposite wall.

    Ask FixBot

    Add Comment

  20. Logitech UE Megablast Motherboard Replacement: step 20, image 1 of 2 Logitech UE Megablast Motherboard Replacement: step 20, image 2 of 2
    • Use the point of a spudger to push on alternating sides of the JST connector to "walk" it out of its socket. Using the tweezers. Gently remove the port by grabbing the connector and removing it from the motherboard.

    • It may take a lot of alternating before the connector comes out. Be patient, and don't pull on the cables.

    • If that doesn't work, use a pair of tweezers to firmly grip the sides of the connector and pull straight away from the socket.

    • If you're having trouble, try rocking the connector side-to-side to loosen it.

    Ask FixBot

    Add Comment

  21. Logitech UE Megablast Motherboard Replacement: step 21, image 1 of 2 Logitech UE Megablast Motherboard Replacement: step 21, image 2 of 2
    • Make sure that all connectors are disconnected from the board.

    • Place your thumbs at the narrow end of the board and push it out of the speaker frame.

    Ask FixBot

    Add Comment

Conclusion

To reassemble your device, follow these instructions in reverse order. Take your e-waste to an R2 or e-Stewards certified recycler.

Cancel: I did not complete this guide.

0 Guide Comments

Add Comment

View Statistics:

Past 24 Hours: 0

Past 7 Days: 3

Past 30 Days: 14

All Time: 116