
Logitech MX Vertical Battery Replacement

Carsten Frauenheim and 4 other contributors
Last updated on Sep 23, 2025
Views: 37K
View statistics:
- Past 24 Hours:
- 34
- Past 7 Days:
- 159
- Past 30 Days:
- 653
- All Time:
- 37,306
Comments: 12
12 guide comments.
Go to guide commentsCompleted: 10 11
10 people have marked this guide "completed." Will you be next?
11 people have marked this guide "completed." Including you — great job!
Favorites: 2 3
2 people have favorited (and subscribed to) this guide. Will you be next?
3 people have favorited (and subscribed to) this guide — including you!
Featured Guide
This guide has been found to be exceptionally cool by the iFixit staff.
Introduction
Go to step 1 ↓Follow this guide to replace a worn-out or dead battery in your Logitech MX Vertical wireless mouse.
It’s natural for batteries to lose capacity as they age. If your mouse dies quickly and doesn't hold a charge, it may be time to replace the battery.
For safety, perform this repair when your battery is below 15% charge. Any charged lithium-ion battery can be hazardous if punctured or damaged. If your battery looks puffy or swollen, take appropriate precautions.
Accessing the battery requires removing the adhesive feet on the mouse’s underside. If thoroughly heated, they can be cleanly removed, but you may need replacement feet if one rips or some of its adhesive is left behind.
What you need
Fix Kit
This kit contains all the parts and tools needed to complete this guide.

Parts


Tools


-
-
-
Before you begin, flip the mouse's power switch down into the OFF position.
-
Unplug all cables from the mouse.
 Ask FixBot
-
-
-
Heat an iOpener and apply it to the feet on the mouse's underside for two minutes.
-
-
-
Insert one arm of a pair of angled tweezers underneath the end of one foot.
-
Grip the foot and begin to peel it away from the bottom of the mouse.
-
-
-
Use the tweezers to peel the foot away from the mouse to completely remove it.
-
-
-
Repeat the process to remove the other foot.
-
Use a spudger to carefully scrape up and remove any remaining adhesive bits.
-
Use isopropyl alcohol and a microfiber cloth to thoroughly clean all adhesive residue from the foot recesses. Allow the surface to completely dry.
-
Remove the feet from their backing and firmly press them into place.
-
-
-
-
-
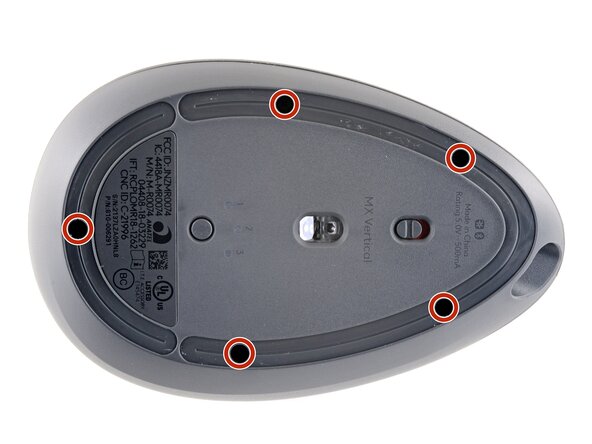
Use a Phillips screwdriver to remove the five 6.5 mm‑long recessed screws securing the two halves of the mouse casing together.
-
-
-
-
Lift the top half of the mouse away from the bottom half.
-
Lay the top half of the mouse—buttons down—onto your work surface, just to the right of the bottom half.
-
-
-
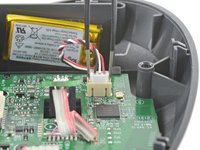
Use a pair of tweezers to firmly grip the battery connector.
-
Gently rock the connector side‑to‑side and pull it straight up and out of the socket.
-
-
Tool used on this step:Tesa 61395 Tape$2.95
-
Peel the battery away from its shelf.
-
Remove the battery.
-
If the battery adhesive is still sticky, you can reuse it. Otherwise, use high-concentration (>90%) isopropyl alcohol and a microfiber or lint-free cloth to remove all the old battery adhesive.
-
If your new battery has adhesive pre-installed, remove the plastic liner to expose the adhesive. Otherwise, apply strips of thin, double-sided tape to the battery well (not directly to the battery) where the old adhesive was.
-
Make sure the cable is on the side nearest its connector and firmly press the battery into place.
-
-






Compare your new replacement part to the original part—you may need to transfer remaining components or remove adhesive backings from the new part before you install it.
To reassemble your device, follow the above steps in reverse order.
Repair didn’t go as planned? Check out our Answers community for troubleshooting help.
Reuse or Recycle—Never put discarded electronic parts in household waste. Visit Logitech Recycling to find your nearest recycling points, including the option to mail back old devices to Logitech for free if there’s no convenient solution in your area. You can also take your e-waste to any R2 or e-Stewards certified recycler. And don’t let good working parts or repaired devices die a slow death in your sock drawer—pass them along to someone who can use them.
Share your experience—Leave a comment here or send your feedback directly to Logitech at repair@logitech.com to help shape future repair guides and product design.
Cancel: I did not complete this guide.
10 other people completed this guide.


12 Guide Comments
¡Excelente guia! ¡Parece haber sido hecha por el fabricante! ¡Muchas gracias!
Is it actually important to replace with the same mAh value?
Or can I go with something bigger as long as the voltage is 3.7V, the connector is the same and the battery actually fits inside the mouse?
Thx for the great disassembly instructions - my mouse stopped charging, but un-plugging and re-plugging the battery did the trick.
