
Logitech G432 Microphone Replacement

Lara Vasquez and 3 other contributors
Last updated on Jun 1, 2023
Views: 2.7K
View statistics:
- Past 24 Hours:
- 3
- Past 7 Days:
- 19
- Past 30 Days:
- 106
- All Time:
- 2,720
Comments: 1
1 comment on steps.
Completed: 1 2
1 person has marked this guide "completed." Will you be next?
2 people have marked this guide "completed." Including you — great job!
Favorites: 0 1
No one has favorited (and subscribed to) this guide. Will you be the first?
1 person has favorited (and subscribed to) this guide — and that's you!
Introduction
Go to step 1 ↓If the microphone in your Logitech G432 headset is loose or needs to be replaced due to being faulty or from wear and tear, use this guide to adjust or replace it.
The Logitech G432 headset includes a built-in microphone that allows you to communicate with other players while gaming. This type of microphone is known as a "gaming microphone," and it is specifically designed to pick up your voice while filtering out background noise and other sounds.
This microphone is a useful tool for gamers who want to communicate with their teammates and coordinate their gameplay effectively. By using a headset with a built-in microphone like the Logitech G432, you can enjoy a more immersive gaming experience and improve your chances of success in multiplayer games.
Before beginning, make sure to turn off the power. If the microphone is powered, make sure to turn it off and unplug it from the power source before making any adjustments or attempting to replace it.
What you need
Tools
-
Spudger4.9


-
-
-
-
Remove the three 1.0 mm screws from the edge of the earpiece using a Phillips #0 screwdriver.
-
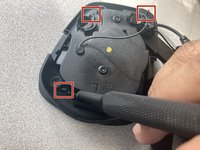
Use the pointed end of a spudger to remove the black sticker covering the fourth screw.
-
Remove the single 1.0 mm screw from beneath the sticker using a Phillips #0 screwdriver.
-
-
-
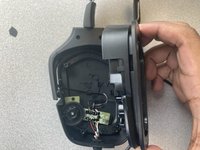
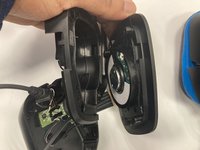
Gently open the headpiece to prevent accidentally pulling apart any of the internal wiring.
-
Use an iFixit opening tool to separate the four black tabs by pushing them apart.
-
-
-
-
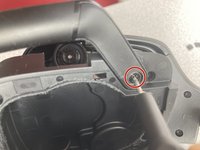
To adjust or remove the microphone piece, use a Phillips #0 Screwdriver to tighten or loosen the 1.0 mm screw that holds it in place.
-
-


 Ask FixBot




To reassemble your device, follow these instructions in reverse order.
Cancel: I did not complete this guide.
One other person completed this guide.

Team

Marist, Team 1-2, Chaterdon Spring 2023 Member of Marist, Team 1-2, Chaterdon Spring 2023
MARS-CHATERDON-S23S1G2
3 Members
60 Guides authored
