
Lenovo V14-IIL Fan Replacement

K.Radford and 2 other contributors
Last updated on Jun 18, 2024
Views: 673
View statistics:
- Past 24 Hours:
- 2
- Past 7 Days:
- 21
- Past 30 Days:
- 81
- All Time:
- 673
Comments: 1
1 comment on steps.
Completed: 2 3
2 people have marked this guide "completed." Will you be next?
3 people have marked this guide "completed." Including you — great job!
Favorites: 0 1
No one has favorited (and subscribed to) this guide. Will you be the first?
1 person has favorited (and subscribed to) this guide — and that's you!
Featured Student Guide
This guide has been the hard work of our awesome students and is found to be exceptionally cool by the iFixit staff.
Introduction
Go to step 1 ↓Fan damage or normal wear may cause the computer to overheat during use. This guide shows how to replace the fan within the Lenovo V14-IIL laptop. Be sure to remove small parts carefully.
Before using this guide, make sure to review the Lenovo V14-IIL troubleshooting page to review if there may be a solution that does not require component replacement.
Make sure to power off your laptop completely and disconnect from any external power source before beginning the process.
What you need
Tools
-
Spudger4.9


-
-
-
Flip your laptop over and place on a flat surface so you can access the screws on the base cover.
-
Remove the six 7 mm screws from the back panel of the laptop using a Phillips #0 screwdriver.
-
Remove the four 4 mm screws from the bottom edge of the laptop using a Phillips #0 screwdriver.
 Ask FixBot
-
-
-
Use an iFixit opening tool to pry apart the case by sliding it along each side of the laptop.
-
-
-
-
-
-
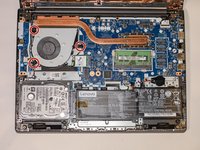
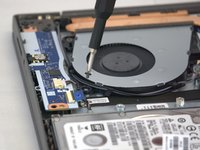
Using a Phillips #0 screwdriver, remove the three 6 mm screws holding the fan.
-
-
-
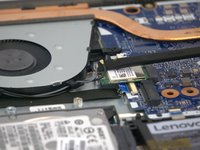
Using the spudger, disconnect the two wireless LAN cables (black and gray) from the wireless LAN card.
-
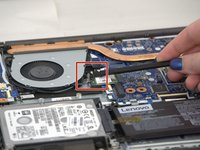
Remove the LAN cables from the three brackets on the fan.
-
-
-
Lift out the fan gently pulling until the four cables disconnect from the motherboard.
-
-






To reassemble your device, follow these instructions in reverse order.
Cancel: I did not complete this guide.
2 other people completed this guide.

Team

Tennessee Tech University, Team 1-2, Pickering Spring 2024 Member of Tennessee Tech University, Team 1-2, Pickering Spring 2024
TNTECH-PICKERING-S24S1G2
3 Members
48 Guides authored
