
Lenovo ThinkPad X280 Fan Assembly Replacement

Jordan Wooten and 5 other contributors
Last updated on Mar 21, 2024
Views: 4.5K
View statistics:
- Past 24 Hours:
- 6
- Past 7 Days:
- 32
- Past 30 Days:
- 139
- All Time:
- 4,466
Comments: 0
No one has left comments on this guide. Will you be first?
Go to guide commentsCompleted: 5 6
5 people have marked this guide "completed." Will you be next?
6 people have marked this guide "completed." Including you — great job!
Favorites: 0 1
No one has favorited (and subscribed to) this guide. Will you be the first?
1 person has favorited (and subscribed to) this guide — and that's you!
Introduction
Go to step 1 ↓This replacement guide will inform users about how to remove the fan assembly on the Lenovo Thinkpad X280.
The fan cools down the computer and prevents it from overheating.
It is important to note that your device may shut down and provide an error message to allow your device to come to an appropriate temperature. In the case that your device’s fan does not cool down to an appropriate temperature, your device will eventually be too hot and potentially spark a fire. A fried or burned area in the surrounding parts of the your device’s fan can also limit the function of the overall computer.
If your devices’s fan has dust in it and get clogged, your fan is making more noise than usual, and/or your device is hot to the touch, it might a result of an insufficient fan and fail to cool your device.
For an additional information use this resource.
What you need


-
-
-
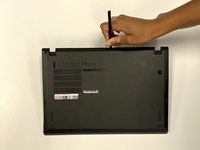
Use a Phillips #1 screwdriver to unscrew the five captive screws on the back panel until a small pop is heard.
-
-
-
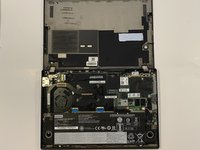
Gently wedge an opening tool or spudger under the back panel, and loosen the clips around the perimeter until the back panel comes off.
-
Remove the back cover.
-
-
-
-
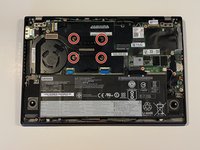
Using the Phillips #1 screwdriver, loosen the four captive screws attached to the heat sink until a small pop sound heard.
-
-
-
-
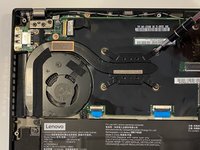
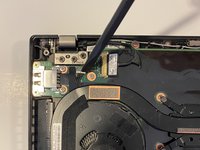
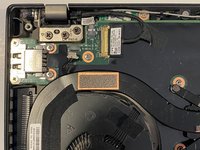
Using the black spudger, gently push out the gray plastic connecter from the plug.
-
-

 Ask FixBot







To reassemble your device, follow these instructions in reverse order.
Cancel: I did not complete this guide.
5 other people completed this guide.

Team

University of Alabama, Team 1-3, Bedsole Fall 2021 Member of University of Alabama, Team 1-3, Bedsole Fall 2021
UA-BEDSOLE-F21S1G3
4 Members
72 Guides authored
