Free Shipping on Domestic Orders $75+

Lenovo ThinkPad T420s Power Jack Replacement

What you need

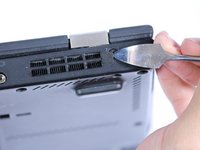
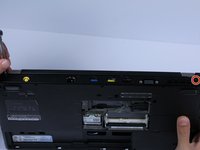
    1. Lenovo ThinkPad T420s Power Jack Replacement, Keyboard: step 1, image 1 of 2 Lenovo ThinkPad T420s Power Jack Replacement, Keyboard: step 1, image 2 of 2
      • Flip your laptop over so the bottom is facing up.

      • Remove the memory panel by removing two black 5mm screws using the Phillips #0.

      • Remove the memory panel.

      Ask FixBot

      Add Comment

    2. Lenovo ThinkPad T420s Power Jack Replacement: step 2, image 1 of 1
      • Remove the two 5mm screw using the Phillips #0 screwdriver.

      • Flip the laptop back over and open it.

      Ask FixBot

      Add Comment

    3. Lenovo ThinkPad T420s Power Jack Replacement: step 3, image 1 of 3 Lenovo ThinkPad T420s Power Jack Replacement: step 3, image 2 of 3 Lenovo ThinkPad T420s Power Jack Replacement: step 3, image 3 of 3
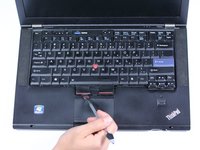
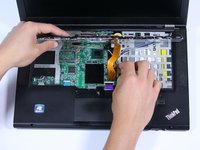
      • Gently push down on the keyboard and slide it towards the screen. This will pop the bottom of the keyboard out of the casing.

      • The best place to push is on the frame of the keyboard by the power button.

      • Using the metal spudger, lift and slide out the keyboard.

      • When lifting the keyboard do not remove it completely because a cable will still be connected to the laptop.

      Ask FixBot

      Add Comment

    4. Lenovo ThinkPad T420s Power Jack Replacement: step 4, image 1 of 1
      • Remove the orange cable by lifting up on the tab on the end of the ribbon connection.

      Ask FixBot

      Add Comment

    1. Lenovo ThinkPad T420s Power Jack Replacement, Palm Rest: step 5, image 1 of 1
      • Remove the additional thirteen 5 mm screws with your Phillips #0 screwdriver.

      • Remove the two 2.5 X 5 mm screws from the back of your laptop.

      • 2.5 X 5 mm screws are slightly larger than the 5 mm screws.

      • Remove the 3 mm screw from the back of the laptop using the same screwdriver.

      Ask FixBot

      Add Comment

    2. Lenovo ThinkPad T420s Power Jack Replacement: step 6, image 1 of 1
      • Disconnect the black and gray antenna cable connectors in the memory panel on the back of the laptop.

      • Remove any plastic wraps on the blue, white, and tan wires.

      Ask FixBot

      Add Comment

    3. Lenovo ThinkPad T420s Power Jack Replacement: step 7, image 1 of 1
      • Flip the laptop back over and pull all the wires from the previous step through to the top side.

      Ask FixBot

      Add Comment

    4. Lenovo ThinkPad T420s Power Jack Replacement: step 8, image 1 of 1
      • Remove the three 5mm screws holding the palm rest casing in place using the Phillips #0.

      Ask FixBot

      Add Comment

    5. Lenovo ThinkPad T420s Power Jack Replacement: step 9, image 1 of 1
      • Unplug the red, white, and blue bunch of wires.

      Ask FixBot

      Add Comment

    6. Lenovo ThinkPad T420s Power Jack Replacement: step 10, image 1 of 1
      • Lift up the black retaining flap holding the purple ribbon cable in place, and carefully slide out the ribbon.

      Ask FixBot

      Add Comment

    7. Lenovo ThinkPad T420s Power Jack Replacement: step 11, image 1 of 1
      • Remove the top casing by lifting up and sliding out.

      • Be careful when sliding the casing out as some of the casing is still underneath the screen; some wiggling may be required, but do not force it.

      Ask FixBot

      Add Comment

    1. Lenovo ThinkPad T420s Power Jack Replacement, LCD: step 12, image 1 of 2 Lenovo ThinkPad T420s Power Jack Replacement, LCD: step 12, image 2 of 2
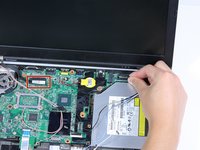
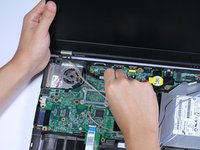
      • Unplug the two black cables that connect the screen to the motherboard.

      Ask FixBot

      Add Comment

    2. Lenovo ThinkPad T420s Power Jack Replacement: step 13, image 1 of 2 Lenovo ThinkPad T420s Power Jack Replacement: step 13, image 2 of 2
      • Flip your laptop so the back-side is facing towards you.

      • Remove any black stickers covering the screws using the nylon or metal spudger.

      • Remove the two 7mm screws using the Phillips #0 screwdriver.

      Ask FixBot

      Add Comment

    3. Lenovo ThinkPad T420s Power Jack Replacement: step 14, image 1 of 1
      • Remove the LCD screen unit by holding the sides and lifting it upwards.

      Ask FixBot

      Add Comment

    1. Lenovo ThinkPad T420s Power Jack Replacement, Power Jack: step 15, image 1 of 1
      • Remove the 3mm screw next to the power jack using the Phillips #0.

      • Once the screw is removed, the power jack should pop up.

      Ask FixBot

      Add Comment

    2. Lenovo ThinkPad T420s Power Jack Replacement: step 16, image 1 of 1
      • Lift the power jack and slide to the right to remove.

      Ask FixBot

      Add Comment

Conclusion

To reassemble your device, follow these instructions in reverse order.

Cancel: I did not complete this guide.

15 other people completed this guide.

Alyssa Elliott

Member since: 04/14/15

827 Reputation

1 Guide authored

Team

Cal Poly, Team 6-13, Maness Spring 2015 Member of Cal Poly, Team 6-13, Maness Spring 2015

CPSU-MANESS-S15S6G13

4 Members

60 Guides authored

6 Guide Comments

This is not the Lenovo Thinkpad T420. You can Tell by the RAM memory Slot Cover and the Position the RAM is put into its slot. the T420 RAM is Vertical Compared with being Horizontal in this Picture. that includes the cover also. Then the Battery Slot is a Dead Giveaway clue. The T420 Battery slot is in the middle. and this Picture has the battery slot to bthe left. Sorry Not Even Close. None of the screws he removes are on the T420. so this is Completely Useless. Thanks

Keith Cloward - Reply Share

This is T420s!

Roman Aleksander Duda - Reply Share

it is not easy to replace a power jack for Lenovo ThinkPad T420S because it requires soldering job and people might burn the board while doing the job, you are replacing a power jack board, just disassemble and assemble the laptop, here is a seller for Lenovo ThinkPad T420S power jack board: http://www.dcincable.com/04w1699-04w3997...

Tom - Reply Share

Thanks for the writeup. How can I test if power is getting out of the actual jack and to the end of the powerjack module? Just wondering across what do I put the MMeter? Thanks. Matt

Matty - Reply Share

https://www.youtube.com/watch?v=rGMFSdFW... This is how you test adapter, this guy also shows you in another video how to test your jack.

Seth Carnett (Mr2ndopinion) - Reply Share

Add Comment

View Statistics:

Past 24 Hours: 3

Past 7 Days: 20

Past 30 Days: 72

All Time: 18,123