Free Shipping on Domestic Orders $75+

Lenovo ThinkPad E14 Gen 4 SSD Replacement

What you need

    1. Lenovo ThinkPad E14 Gen 4 SSD Replacement, Back Panel: step 1, image 1 of 3 Lenovo ThinkPad E14 Gen 4 SSD Replacement, Back Panel: step 1, image 2 of 3 Lenovo ThinkPad E14 Gen 4 SSD Replacement, Back Panel: step 1, image 3 of 3
      • First start off by using your screwdriver to remove the screws from the back metal shield or cover. Loosen all seven captive screws on the back panel of the device with a Phillips #1 screwdriver.

      Ask FixBot

      Add Comment

    2. Lenovo ThinkPad E14 Gen 4 SSD Replacement: step 2, image 1 of 3 Lenovo ThinkPad E14 Gen 4 SSD Replacement: step 2, image 2 of 3 Lenovo ThinkPad E14 Gen 4 SSD Replacement: step 2, image 3 of 3
      • Insert an opening pick into the seam near the hinges.

      • Working from the hinges to the front, gently pry apart the back of the device from the main body.

      • You should hear little pops and see a small gap forming at the seam before attempting to remove.

      • Plastic pry tools are the best to use with electronics such as phones, tablets, and laptops because they are designed to break before the device does.

      Ask FixBot

      Add Comment

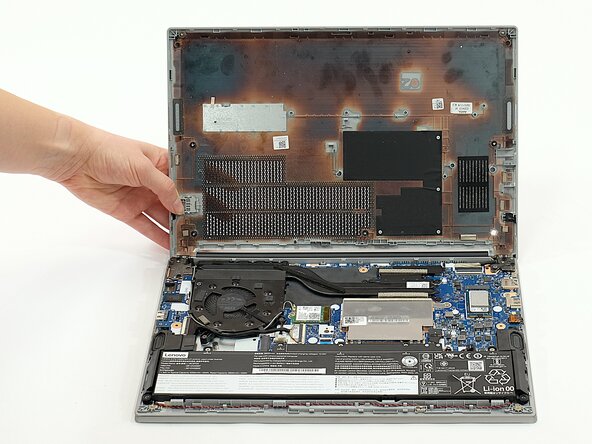
    3. Lenovo ThinkPad E14 Gen 4 SSD Replacement: step 3, image 1 of 1
      • Carefully lift the loosened panel away from the laptop. The metal spudger is useful when extra prying force is needed, but a black nylon spudger or iFixit opening tool should be used whenever possible.

      • Before attempting to lift the panel off, make sure it has been pried away from all edges and corners of the device. Trying to remove the back panel when any part is still firmly attached to the laptop can cause damage to the device.

      Ask FixBot

      Add Comment

    1. Lenovo ThinkPad E14 Gen 4 SSD Replacement, Battery: step 4, image 1 of 2 Lenovo ThinkPad E14 Gen 4 SSD Replacement, Battery: step 4, image 2 of 2
      • Remove all five 5mm screws from the battery using a Phillips #1 screwdriver.

      Ask FixBot

      Add Comment

    2. Lenovo ThinkPad E14 Gen 4 SSD Replacement: step 5, image 1 of 2 Lenovo ThinkPad E14 Gen 4 SSD Replacement: step 5, image 2 of 2
      • Using the fabric tag, disconnect the battery cables from their port inside the device.

      Ask FixBot

      Add Comment

    3. Lenovo ThinkPad E14 Gen 4 SSD Replacement: step 6, image 1 of 2 Lenovo ThinkPad E14 Gen 4 SSD Replacement: step 6, image 2 of 2
      • Lift the battery out of the device using a PH0 size 2.71mm.

      Ask FixBot

      Add Comment

    1. Lenovo ThinkPad E14 Gen 4 SSD Replacement, SSD: step 7, image 1 of 2 Lenovo ThinkPad E14 Gen 4 SSD Replacement, SSD: step 7, image 2 of 2
      • Locate the SSD socket you want to work with.

      • Your ThinkPad came with one SSD by the HDMI port. There is space to put in a second one below the fan.

      Ask FixBot

      Add Comment

    2. Lenovo ThinkPad E14 Gen 4 SSD Replacement: step 8, image 1 of 1
      • Remove the 3mm Phillips #1 screw.

      Ask FixBot

      Add Comment

    3. Lenovo ThinkPad E14 Gen 4 SSD Replacement: step 9, image 1 of 2 Lenovo ThinkPad E14 Gen 4 SSD Replacement: step 9, image 2 of 2
      • Lift the edge of the SSD card and pull it out.

      • Be careful not to touch the contact edge of the card, which has gold connectors and plugs into the socket, as this can damage it.

      • If you're replacing the SSD card that came with your Lenovo, it may have an adhesive block of foam to protect it from stress. You can transfer this to the new SSD or replace it.

      Ask FixBot

      Add Comment

Conclusion

To reassemble your device, follow these instructions in reverse order.

Cancel: I did not complete this guide.

0 Guide Comments

Add Comment

View Statistics:

Past 24 Hours: 8

Past 7 Days: 41

Past 30 Days: 142

All Time: 849