
Free Shipping on Domestic Orders $75+

Lenovo ThinkPad E14 Gen 4 Keyboard Replacement

What you need

  1. Lenovo ThinkPad E14 Gen 4 Keyboard Replacement, Back Panel: step 1, image 1 of 3 Lenovo ThinkPad E14 Gen 4 Keyboard Replacement, Back Panel: step 1, image 2 of 3 Lenovo ThinkPad E14 Gen 4 Keyboard Replacement, Back Panel: step 1, image 3 of 3
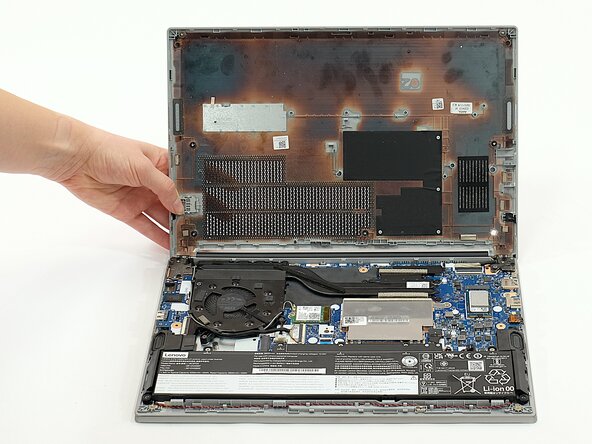
    • First start off by using your screwdriver to remove the screws from the back metal shield or cover. Loosen all seven captive screws on the back panel of the device with a Phillips #1 screwdriver.

    Ask FixBot

    Add Comment

  2. Lenovo ThinkPad E14 Gen 4 Keyboard Replacement: step 2, image 1 of 3 Lenovo ThinkPad E14 Gen 4 Keyboard Replacement: step 2, image 2 of 3 Lenovo ThinkPad E14 Gen 4 Keyboard Replacement: step 2, image 3 of 3
    • Insert an opening pick into the seam near the hinges.

    • Working from the hinges to the front, gently pry apart the back of the device from the main body.

    • You should hear little pops and see a small gap forming at the seam before attempting to remove.

    • Plastic pry tools are the best to use with electronics such as phones, tablets, and laptops because they are designed to break before the device does.

    Ask FixBot

    Add Comment

  3. Lenovo ThinkPad E14 Gen 4 Keyboard Replacement: step 3, image 1 of 1
    • Carefully lift the loosened panel away from the laptop. The metal spudger is useful when extra prying force is needed, but a black nylon spudger or iFixit opening tool should be used whenever possible.

    • Before attempting to lift the panel off, make sure it has been pried away from all edges and corners of the device. Trying to remove the back panel when any part is still firmly attached to the laptop can cause damage to the device.

    Ask FixBot

    Add Comment

  4. Lenovo ThinkPad E14 Gen 4 Keyboard Replacement, Battery: step 4, image 1 of 2 Lenovo ThinkPad E14 Gen 4 Keyboard Replacement, Battery: step 4, image 2 of 2
    • Remove all five 5mm screws from the battery using a Phillips #1 screwdriver.

    Ask FixBot

    Add Comment

  5. Lenovo ThinkPad E14 Gen 4 Keyboard Replacement: step 5, image 1 of 2 Lenovo ThinkPad E14 Gen 4 Keyboard Replacement: step 5, image 2 of 2
    • Using the fabric tag, disconnect the battery cables from their port inside the device.

    Ask FixBot

    Add Comment

  6. Lenovo ThinkPad E14 Gen 4 Keyboard Replacement: step 6, image 1 of 2 Lenovo ThinkPad E14 Gen 4 Keyboard Replacement: step 6, image 2 of 2
    • Lift the battery out of the device using a PH0 size 2.71mm.

    Ask FixBot

    Add Comment

  7. Lenovo ThinkPad E14 Gen 4 Keyboard Replacement, Fan & Heatsink: step 7, image 1 of 2 Lenovo ThinkPad E14 Gen 4 Keyboard Replacement, Fan & Heatsink: step 7, image 2 of 2
    • Loosen the seven screws from the fan and heat sink using a Phillips #1 screwdriver.

    Ask FixBot

    Add Comment

  8. Lenovo ThinkPad E14 Gen 4 Keyboard Replacement: step 8, image 1 of 1
    • Unplug the fan connector from the motherboard.

    • It is under another wire so it might be a bit tricky to wiggle it out.

    Ask FixBot

    Add Comment

  9. Lenovo ThinkPad E14 Gen 4 Keyboard Replacement: step 9, image 1 of 2 Lenovo ThinkPad E14 Gen 4 Keyboard Replacement: step 9, image 2 of 2
    • Unplug and unwind the coaxial wires attached to the Wireless LAN card.

    • The gray wire attaches to the main plug, and the black wire attaches to the auxiliary plug.

    Ask FixBot

    Add Comment

  10. Lenovo ThinkPad E14 Gen 4 Keyboard Replacement: step 10, image 1 of 1
    • Lift the fan and heatsink out of the device.

    • They are attached at the base and can come apart, but only separate them for replacement and/or cleaning.

    Ask FixBot

    Add Comment

  11. Lenovo ThinkPad E14 Gen 4 Keyboard Replacement: step 11, image 1 of 3 Lenovo ThinkPad E14 Gen 4 Keyboard Replacement: step 11, image 2 of 3 Lenovo ThinkPad E14 Gen 4 Keyboard Replacement: step 11, image 3 of 3
    • For cleaning the fan, detach it from the heatsink and flip it over.

    • Unscrew the four 3mm Phillips #1 screws and lift the back plate off to provide direct access to the fan.

    Ask FixBot

    Add Comment

  12. Lenovo ThinkPad E14 Gen 4 Keyboard Replacement: step 12, image 1 of 2 Lenovo ThinkPad E14 Gen 4 Keyboard Replacement: step 12, image 2 of 2
    • The thermal paste may need to be replaced before you put things back together. Look for the spot the heatsink was previously attached; if the surface seems dried out, that will need to be removed.

    • Make sure you remove all of the old thermal paste before applying new paste.

    Ask FixBot

    Add Comment

  13. Lenovo ThinkPad E14 Gen 4 Keyboard Replacement, Internal Speakers: step 13, image 1 of 1
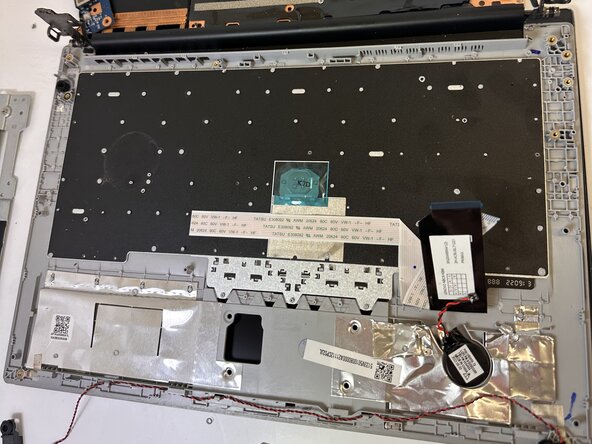
    • Unplug the speaker wires from the motherboard using a pair of tweezers.

    Ask FixBot

    Add Comment

  14. Lenovo ThinkPad E14 Gen 4 Keyboard Replacement: step 14, image 1 of 2 Lenovo ThinkPad E14 Gen 4 Keyboard Replacement: step 14, image 2 of 2
    • Lift the protective foil from the wires—this is to prevent the battery from making direct contact and damaging them.

    Ask FixBot

    Add Comment

  15. Lenovo ThinkPad E14 Gen 4 Keyboard Replacement: step 15, image 1 of 3 Lenovo ThinkPad E14 Gen 4 Keyboard Replacement: step 15, image 2 of 3 Lenovo ThinkPad E14 Gen 4 Keyboard Replacement: step 15, image 3 of 3
    • Remove one speaker and begin unhooking the cord; you can begin with either one. Pull the wires carefully; they are woven between plastic dividers to keep them from tangling and it may be a tight fit in some spots.

    • Remove the second speaker.

    Ask FixBot

    Add Comment

  16. Lenovo ThinkPad E14 Gen 4 Keyboard Replacement, Keyboard: step 16, image 1 of 3 Lenovo ThinkPad E14 Gen 4 Keyboard Replacement, Keyboard: step 16, image 2 of 3 Lenovo ThinkPad E14 Gen 4 Keyboard Replacement, Keyboard: step 16, image 3 of 3
    • Use a spudger to remove the metal panel from the computer.

    Ask FixBot

    Add Comment

  17. Lenovo ThinkPad E14 Gen 4 Keyboard Replacement: step 17, image 1 of 3 Lenovo ThinkPad E14 Gen 4 Keyboard Replacement: step 17, image 2 of 3 Lenovo ThinkPad E14 Gen 4 Keyboard Replacement: step 17, image 3 of 3
    • Remove the keyboard from the laptop.

    Ask FixBot

    Add Comment

Conclusion

To reassemble your device, follow these instructions in reverse order.

Cancel: I did not complete this guide.

0 Guide Comments

Add Comment

View Statistics:

Past 24 Hours: 2

Past 7 Days: 27

Past 30 Days: 91

All Time: 176